Pages

.

Mussels in White Wine


It's hard to take a good picture of mussels in a bowl. I don't think that the picture above does this dish justice. Because I'm going to make a serious proclamation: These are some of the best mussels I've ever eaten! And I'm the cook! I'm so proud.

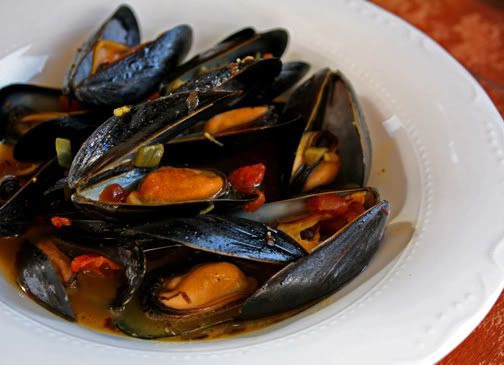
And not only are these mussels incredibly tasty, but they are incredibly easy to prepare - and the dish comes together really fast too!

Mussels feel fancy to me, yet they are so much less expensive than other seafood items in the store. I got a 3 1/2 lb. bag of them for just over $3.00. I can appreciate that, can't we all? In comparison, I keep wanting to buy scallops, but I just can't justify spending the money on them lately. They are $13.00 a pound for fresh (not frozen) large scallops - and that's here in new England.

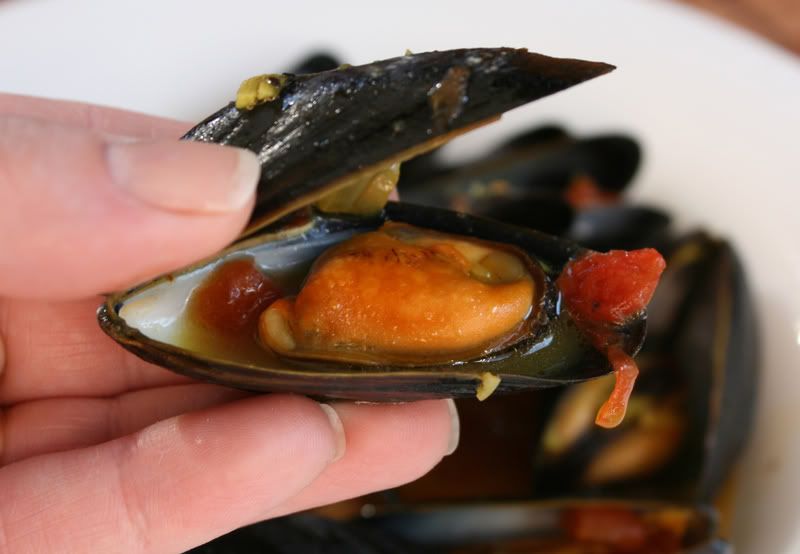
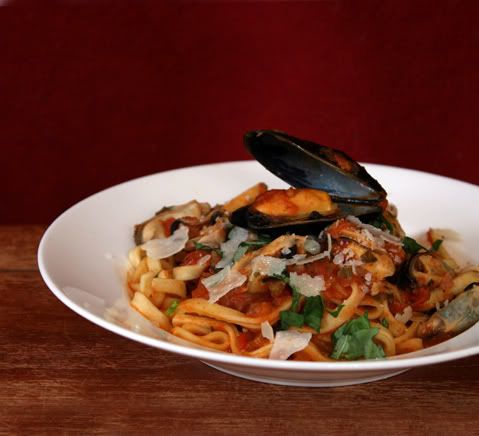
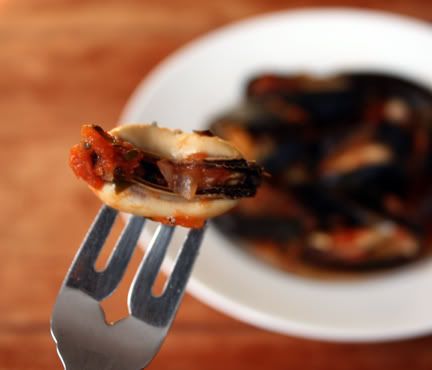
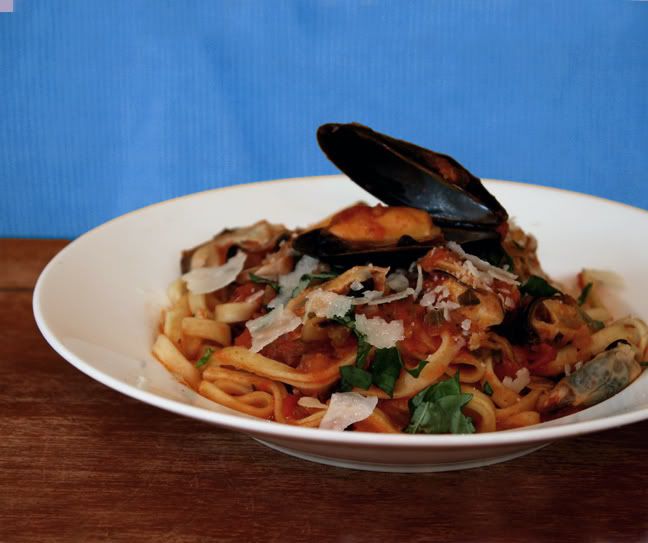
I recommend these mussels to all you shellfish eaters. You can impress yourself and your friends with them. They are great as a side dish, but I could totally see tossing them in pasta. The sauce is really flavorful and so pretty too! When my mussels were done, I would have dipped in crusty bread, but I didn't have any. So I cooked up some rice and had it like this:


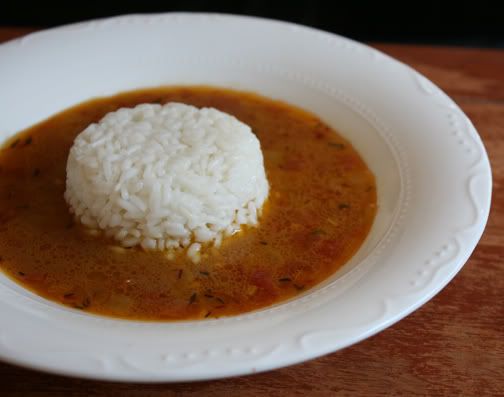
Isn't that broth so beautiful! It was delicious. And since making it, I bought some crusty bread to have with the still-leftover broth.

I will definitely, without a doubt, make this mussel dish again!

Mussels in White Wine
Adapted from Barefoot Contessa

Serves 1 as a main dish - 2 as an appetizer

3 pounds cultivated mussels
1/3 cup all-purpose flour
2 tablespoons unsalted butter
2 tablespoons good olive oil
1/2 cup chopped sweet onion
3 cloves garlic, minced
1/2 cup petite diced canned tomatoes, drained
1/2 teaspoon good saffron threads, crumbled
1/2 teaspoon thyme
1 cup good white wine - I used a chardonnay
1/2 teaspoon kosher salt
1 teaspoon freshly ground black pepper

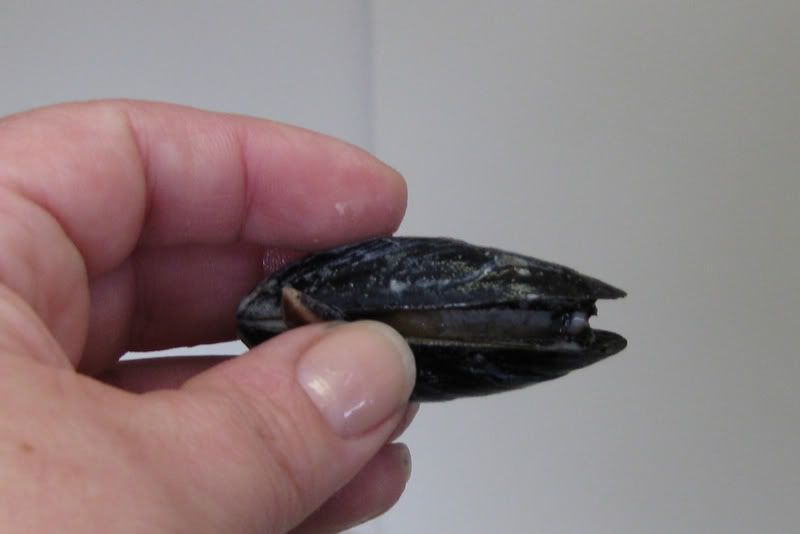
When you open your mussels, you want to remove any that might not be alive. If the shells are closed tightly, you can trust the mussel. If the shell is open, quickly press it together.

It will spring open some, and at that point, a live mussel will close on it's own (sometimes it takes a few seconds). I tend to do this to all the open ones as I sort through the mussels. I put any open to the side. When I'm done sorting, I go back to the ones that were open and see if they closed. Toss any that didn't close!

Sometimes mussels have sand in them. It's not pleasant when you bite into them, so here's how to remove that pesky sand: Fill a large bowl to completely submerge your mussels with a couple of inches of water on top. Sprinkle 1/3 cup flour into the water and mix. Then add the mussels. Leave them in the water (some will float) for 1/2 hour.

Drain the flour water and rinse the mussels. You are likely to see all the sand they spit out as you pour off that water and see the bottom of the bowl. Pull off any beards from the mussels and scrub off any dirt. Now your mussels are ready.

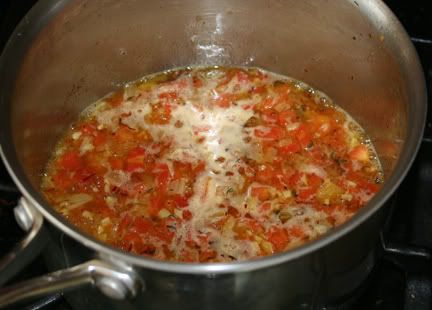
Heat-up the butter and olive oil in a deep stock pot. After about 4 minutes, add the saffron. After 2 more minutes, add the garlic, tomatoes, parsley, thyme, wine, and salt. Bring the mixture to a boil.

Add the mussels and cover the pot. Cook for 8-10 minutes on medium heat. Shake the pot (while it's covered) from time to time so that the juice can get to the ones on top, and so that they don't scorch on the bottom.

You're done now! Enjoy your mussels.

reade more... Résuméabuiyad

Homemade Black Bean Burgers ♥ Recipe

Today's recipe: Quick and easy black bean burgers, made at home with easy pantry ingredients. You can even freeze your own!

For years, I have forsworn veggie burgers. (Ewww, the salty-slimy 'Garden' Burger? To my taste, more like a compost heap.) No more, no more!! I've been missing out, completely, because -- yay, rah! -- we can make homemade black bean burgers.

And it's easy! And cheap! And -- this is the crucial test -- they taste great! And they pull together in a flash. And better than THAT? They freeze! Next time I'll make up a big batch, vacuum pack them with the FoodSaver, to have on hand, pronto, for a quick lunch or light supper.

PS To the punctuation police blinking in disbelief about all the exclamation points? Try one of these black bean burgers, you'll be backflipping too. (!!!!)

RECIPE for HOMEMADE BLACK BEAN BURGERS

Hands-on time: 20 minutes
Time to table: 20 minutes
Serves 4

1 tablespoon olive oil
1/2 cup chopped green onion, roughly chopped
1/3 cup finely chopped poblano pepper (I used 2 rings of Pickled Jalapeño Rings)
2 cloves garlic, roughly chopped

1/2 cup fresh cilantro (I used parsley)
15 ounces canned black beans, rinsed and drained

1/2 cup toasted whole-grain bread crumbs
1 large egg, lightly beaten
1/2 teaspoon chili powder
1/2 teaspoon cumin
Kosher salt to taste

1 tablespoon olive oil for cooking

In a large skillet, heat the olive oil until shimmery. Stir in the green onion, peppers and garlic and cook until just beginning to turn brown. Transfer to a food processor. Add the cilantro and process until roughly chopped, several pulses. Add the beans and pulse five or six times, so beans are broken up but still in small chunks. (You don't want to overprocess, you're not aiming for a black bean paste.) Transfer to a large bowl, then stir in the remaining ingredients. Form into four patties.

In the same large skillet, heat another tablespoon or so of olive oil until shimmery. Gently add the patties, cook each side until browned, about 5 minutes total.

FREEZING TIPS If freezing, from into patties and let patties chill thoroughly, then transfer to freezer bags or vacuum pack in a FoodSaver. For better results, thaw before frying, just drop the freezer bag into a dish of cold water for 15 minutes.


KITCHEN NOTES
The inspiring recipe says to let the mixture refrigerate for 30 minutes - 4 hours before frying. I cooked two right away, another two an hour later. No difference.
The inspiring recipe says these burgers are too delicate for cooking on a grill. I would think you could get away with it, so long as a cooking basket is used, not the standard grill.
Note to Vegetarians

A Veggie Venture - Printer Friendly Recipe Graphic


MORE FAVORITE DRIED BEAN RECIPES
~ 15-Bean Soup ~
~ Chard & Chickpeas with Feta ~
~ Chicka Chicka Chickpea Lunch ~

~ more dried bean recipes ~
~ more Weight Watchers recipes ~
~ more low-carb recipes ~

FOR THOSE WHO EAT MEAT
~ Spinach Burgers ~

from Kitchen Parade, my food column
~ Green Chile Burgers ~


Looking for healthy ways to cook vegetables? A Veggie Venture is home to hundreds of quick, easy and healthful vegetable recipes and the famous Alphabet of Vegetables. Healthy eaters will love the low carb recipes and the Weight Watchers recipes.
© Copyright 2009

reade more... Résuméabuiyad

Moroccan-Style Chicken Pie


My latest Bon Appétit magazine has been sitting on my coffee table for a week. I finally opened it today and a few recipes caught my eye. This is one of them.

I like this recipe for many reasons! First, the ingredients are readily available. I had almost all of them right here at home. Next, it was an easy recipe to make - no complicated procedures here. Finally, the pie was wonderfully aromatic, flavorful, and satisfying.

I loved the combination of sweet and savory, too. And the crunchy phyllo topping with nuts and sugar (and salt) between the layers was really nice.
I'm not sure how necessary it was having 6 layers of phyllo on the bottom and 4 on the top. I would switch that around for next time. The other thing I would do differently would be to cut the bottom layers of phyllo the way the recipe recommended (using the bottom of the pie plate), but make the top layers bigger. As you can see below, the top layers weren't quite big enough.

But those are minor little adjustments that I can recommend to you if you try this recipe.
Speaking of the recipe, I really didn't stray much from what was published in Bon Appétit. I used butter flavored cooking spray instead of butter between the bottom 6 layers of phyllo dough. I did use butter between the top layers because they were exposed and I didn't want to risk the texture being wrong. Also, I used granulated sugar for the crust, and skipped the cinnamon (by accident!).

Moroccan-Style Chicken Pie
Slightly Adapted from Bon Appétit

Serves 5-6 people.

Filling Ingredients
2 tablespoons olive oil
1 large sweet onion, chopped
salt and pepper to taste
1 teaspoon ground cinnamon
1 teaspoon ground ginger
1/2 teaspoon turmeric
1/8 teaspoon crumbled saffron threads
2 tablespoons all purpose flour
2 cups low-salt chicken broth (I used home made stock)
1 1/2 pounds skinless boneless chicken thighs
1/4 cup chopped golden raisins
2 tablespoons chopped fresh cilantro
2 tablespoons chopped fresh Italian parsley

Crust Ingredients
1/2 cup slivered almonds
2 tablespoons granulated sugar
1/2 teaspoon salt
10 sheets (about 17x12 inches) fresh phyllo pastry or frozen, thawed
1/4 cup unsalted butter, melted*

* I used less butter because I used cooking oil between the layers for the bottom of the pie. I also went easy on the butter for the layers of the top crust. I don't think you need more than 1/4 cup to prepare the crust with all butter.

To Prepare The Filling
Put a large, heavy pan over medium heat on the stove. Add the oil and the onion. Season the onion with salt and pepper and cook for approximately 10 minutes until the onions are soft and transparent. At that point, sprinkle them with the ginger, cinnamon, tumeric, and saffron. Continue to cook the onions for one minute. Then, sprinkle them with a tablespoon of flour and cook for one more minute.

Add the chicken stock to the pan and the chicken thighs. Cook, uncovered, for about 20 minutes so that the thighs are cooked through. Turn them over midway through the cooking time. Here's my chicken when it was done.


Remove the chicken from the pan and add the golden raisins to the sauce. Once the chicken is cool enough, shred it. Then combine the chicken and the sauce and place the mixture in the refrigerator to cool. Here's my finished filling:

It is supposed to cool completely before assembling the pie.

The pie assembly goes very quickly. So turn on your oven to 375 degrees and start preheating.

Prepare The Crust Ingredients
In a small food processor, mix the almonds, sugar, and salt until it is evenly processed and resembles coarse salt.

Cut The Phyllo Dough
Remove 10 sheets of phyllo dough from the package. Put the rest back in the freezer. Split the 10 sheets of phyllo so that you have 5 for the top layer of the pie, and 5 for the bottom. Keep the phyllo covered with a damp (not soaking wet) paper towel or two while you are not using it. Phyllo dries out very quickly, so you want to keep it moist.

Place the 5 layers designated for the bottom of the pie on a working surface. Put the pie pan you are using on top and cut around the bottom edge of the pie pan so that you have 5 phyllo disks that will perfectly fit into your pie pan. Put the disks on a plate and cover them with the damp paper towels.

Place the 5 layers designated for the top of the pie on a working surface. Place the pie pan on top. This time, when you cut through the layers of phyllo, trace the edges of the top of the pie pan, which will give you larger disks for the top of the pie. You want these disks to fit perfectly on top of the pie once it is filled with the chicken mixture. Put the disks on a plate and cover them with the damp paper towels.

To Assemble The Pie
Work with the bottom layers of phyllo first. Remove one sheet of phyllo. Brush butter on it and then top with a sprinkling of the sugar-almond mixture. Place another sheet of phyllo on top and repeat the procedure. Keep repeating until you have the five layers of phyllo ready. Place them in the bottom of the pie pan.

Cover the bottom layers of phyllo with the chicken filling.


With the top layers of phyllo, use the same procedure of buttering the dough and sprinkling with the sugar-almond mixture until all five layers are ready. Place them on the top of the pie and tuck in any extra edges into the pie pan. Top with the remaining sugar-almond mixture.


Bake the pie for 35-40 minutes, until the top is golden brown.


reade more... Résuméabuiyad

Warm Butternut Squash & Chickpea Salad with Tahini Dressing ♥ Recipe

Today's vegetable recipe: A warm salad, roasted winter squash tossed with chickpeas and a lemon-brightened tahini dressing. Vegan.

Last fall, I asked readers what they wanted 'more of' from A Veggie Venture. The answers came back 'more of the same' (thanks for that vote of confidence!) and 'more vegetarian suppers' (okay, great idea!). But the truth is, at the moment, my diet includes more meat than it has for many years, so vegetarian meals require more planning, less habit. My new tactic, for my own flexitarian lifestyle and to satisfy readers' requests, is to set aside one day a week for a vegetarian meal. With any luck, it'll work out for everyone!

First up, this warm salad made from roasted winter squash. I added a sweet potato -- that's optional, of course. I also lightened the dressing by reducing the olive oil and using only half the dressing, a good idea for anyone who watches calories. Even lightened, the calories add up for a salad. That said, this was an extremely satisfying salad, warm and aromatic, with good texture contrast between the roasted squash and the chickpeas. The tahini dressing is especially good, a definite keeper.

WARM BUTTERNUT SQUASH & CHICKPEA SALAD with TAHINI DRESSING

Hands-on time: 40 minutes
Time to table: 1-1/2 hours
Makes about 5 cups
See the inspiring recipe at Smitten Kitchen

SALAD
3 garlic cloves, minced
1/2 teaspoon 'spice to taste' (see TIPS)
2 tablespoons olive oil
Kosher salt to taste
1 butternut squash, washed, peeled, seeded and cut into bite-size pieces (here's how to peel and cut a butternut squash without losing a finger)
1 large sweet potato, peeled, cut into pieces slightly smaller than the butternut squash, optional (see TIPS)
15 ounces canned chickpeas, rinsed and drained
1/4 cup finely chopped red onion
1/4 cup chopped fresh parsley or cilantro

TAHINI DRESSING (see TIPS)
1 clove garlic, minced
Zest and juice of one lemon
1-1/2 tablespoons tahini, stirred well
2 tablespoons water

SALAD Preheat oven to 425F. In a large bowl (see TIPS), whisk the garlic, allspice, olive oil and salt. Stir in the butternut squash and sweet potato and stir well to coat. Transfer to a rimmed baking sheet, roast for 25 - 40 minutes, stirring once or twice, until squash and sweet potatoes are fully cooked and beginning to brown. Toss together the squash, sweet potatoes, chickpeas, onion, parsley and dressing. Serve warm.

DRESSING While the squash roasts, whisk all the dressing ingredients.


KITCHEN NOTES
The inspiring recipe calls for allspice and this is what I used. But my favorite spices with butternut squash are curry and ginger so these would be my choices the next time. Really, anything will do -- think of the spice that will best complement the rest of the meal or is your own favorite.
I was short on butternut squash, which is all the inspiring recipe uses, so added a sweet potato. This added both color and flavor variation which I loved. But the squash cooked faster than the sweet potato so to compensate, if using both, make sure the sweet potatoes are cut slightly smaller.
I ended up with about two times as much dressing as needed so give the amount that I would make again, versus the amount specified.
I like to use a really big bowl for tossing vegetables for roasting. It makes it easier to use less oil and still coat the vegetable pieces really well.
LEFTOVERS: The squash and sweet potatoes reheated beautifully in the oven but the chickpeas turned into little bullets. They kind of separate from the squash anyway, next time I'll scoop them out before warming the squash.


Looking for healthy ways to cook vegetables? A Veggie Venture is home to hundreds of quick, easy and healthful vegetable recipes and the famous Alphabet of Vegetables. Healthy eaters will love the low carb recipes and the Weight Watchers recipes.
© Copyright 2009

reade more... Résuméabuiyad

ChocoLee in Boston's South End


I was browsing through Boston.com the other day and saw their story on Boston's best new restaurants. The very first picture in the slideshow was of ChocoLee chocolates. And in the description it read, "Be sure to sample the main draw, offered only on the weekends: beignets oozing with a ganache of dark chocolate and mascarpone. "

Well, they didn't have to tell me twice! I was all over that, immediately emailing several friends trying to find one who would go with me on Saturday.

I had figured that since ChocoLee was listed as a best "restaurant" and they had beignets, that there would be seating with a small selection of drinks and pastries. But while there was no seating and no menu, it was absolutely worth the trip into Boston's South End.

ChocoLee is located at 83 Pembroke Street, which is right around the corner from Tremont Street. If you drive in, you'll need to park on Tremont Street and have plenty of quarters to feed the meter. If you take the T, the Back Bay orange line station was within walking distance.

I did love the large metal bowls of "chocolate" and monster-sized whisks in the windows.


One can't help but notice the magazines full of praise for Chocolee that are displayed near the above window. There was also one of those Boston's Best signs from the well-known annual poll of Boston residents.


There were two women working behind the counter. They were very friendly and approachable. I mentioned that I had a food blog and asked if I could take pictures, and they didn't hesitate to let me.

They did not know of the Boston.com Best of the new restaurants story. I mentioned that I had driven in from Worcester County and they asked if I came into town just for their chocolates. I should have just fessed up and said yes, I did. But I made myself look like less of a chocolate freak and I mentioned that I decided to make a day of it and meet friends there for those chocolate beignets and lunch somewhere. Just then, my friends Karen and Jon walked in the door.

They make the beignets to order right there. They were nice and hot when they handed my order to me in a bag and warned me that the liquid ganache inside was very hot and to be careful. My mouth was watering. Not only did I get the beignets, but also a number of their delectable looking chocolates. I like being able to choose which kinds I want instead of being forced to buy a pre-packaged box of the flavors someone chooses to give me.

The chocolates were in a glass display and were fresh. In fact, there were more freshly made chocolates on the counter top behind the display. They make the chocolates right there, daily!


I loved the chocolate pod displayed on the top of the counter next to the chocolate dipped strawberries (the pod was a replica).


For the chocolates I got lavender, toasted sesame, lemon curd, lime curd, ginger, vanilla ganache, cardamom, chile, lemon pistachio, salt caramel, and I think the last one was cherry cordial. I should have written down the exact names, but I wasn't thinking. So those are my approximations of the names of the flavors.

I've had three of my chocolates so far, and each one has been wonderful. I like that they had flavors that weren't chocolate inside and out. The lemon curd was exactly that - lemon curd inside a delicious dark chocolate shell. The lavender was in a white, creamy filling. I loved it as well. The third one I had was what I think was cherry cordial. All of the chocolates were incredibly satisfying and as fresh as could be.

But lets get on to the beignets! As soon as we walked outside the door, we all dug into them. It was hard to take this picture without gorging on this little dough ball filled with chocolaty goodness.


And here's the glorious inside:


OMG! It was pure heaven!!!!! But they must be eaten carefully! If you don't bite into it correctly, the chocolate ganache squirts out. So my advice is to tear off a bit of the dough to expose the chocolate without putting pressure on it! At that point, Jon sucked the chocolate out of the beignet, while Karen and I just put the entire thing in our mouths. It was totally chocogasmic!

I won't hesitate to go into Boston again - just to visit ChocoLee, and for no other reason but pure chocolate indulgence.


reade more... Résuméabuiyad

Mussels with Tomatoes, Herbs and Garlic (Moules Provençale)


Public Television has the best of the cooking shows these days. They aren't trying to hook people with a personality that pushes a marketing strategy. It's all about the food, the ingredients, and the techniques of some of the best chefs around - be they big TV personalities or not.

Yesterday I watched Jacques Pepin cooking up some mussels in a spicy red sauce with rice. While I didn't feel like trying that particular recipe, he did remind me of how much I love mussels. He also taught me a thing or two about using mussels, which I've only cooked one other time.

Before you cook your mussels, you want to know they are alive - they should be! If you are looking through your mussels, a closed shell is good. And you see some that are open, tap on the shell, or tap the shell on the counter. A live mussel will close up before your eyes. If a mussel doesn't close up, throw it away - it's dead.

Joe picked up a pound of mussels for me yesterday. I didn't want to make them yet, so I looked up the proper storage method. I didn't want to kill the little critters (which I did last time)! To keep them alive, make sure they are not in an airtight container. I took some online advice and put them in a bowl and covered with a damp towel. My mussels were still alive and well today - perfect for me to kill them!

I like the smaller mussels. When I've had larger mussels, I didn't think they had a lot of flavor, and they seemed rubbery. Here was my batch of happy small mussels:


Mussels with Tomatoes, Herbs and Garlic (Moules Provençale)
Adapted from The Blego Cookbook (posted on epicurious.com)

2 1/4 lbs mussels, cleaned (I used less, but 2 1/4 is the max)
1/2 cup dry white wine
1 tablespoon olive oil
1 1/4 cup sweet white onions, chopped
1/3 cup celery, chopped
1 garlic clove, chopped
2 tablespoons chopped fresh basil, plus extra to garnish
1/4 cup chopped fresh flat-leaf parsley
1 bay leaf
1/4 tsp thyme
1 tablespoon tomato paste
1 lb. ripe plum tomatoes, peeled and chopped, or 1 14-oz can chopped tomatoes
salt and pepper
Parmesan cheese (optional)

Saute the onions and celery over medium-high heat. Salt and pepper to taste.

While it cooks, put all other ingredients (except the cheese) into a medium sized pot. Add the celery and onion when it is ready.

Cook until it boils. I don't like tomato chunks, so I used my immersion blender here. Little chunks are fine, but no more big ones.

Add the mussels. Stir around. Cover and cook one minute. When you uncover, they will already be opening. I stirred here to let the sauce into the shells more. Then cook two minutes more.

You could decide to eat it just like this! It's pretty good stuff:


Just look at that delectable little morsel. It's smiling at me!


You could also serve it on pasta, with chopped basil and Parmesan cheese.


Mussels with Tomatoes, Herbs and Garlic (Moules Provençale)

Public Television has the best of the cooking shows these ...

See Mussels with Tomatoes, Herbs and Garlic (Moules Provençale) on Key Ingredient.

reade more... Résuméabuiyad