Pages

.

Showing posts with label dessert. Show all posts

Sweet Sunday: Apple Cake - via Dorie Greenspan and Her Friend Marie-Hélène

As I dive into the sweet and yeasty side of cooking where I once believed, "hic sunt monstra" (here, be monsters), I have become more relaxed and a little more confident, but when I saw what the cake batter looked like after the apples were added, I kinda freaked out, thinking I'd made some egregious and fatal error because it looked like there were too many apples and not enough batter.

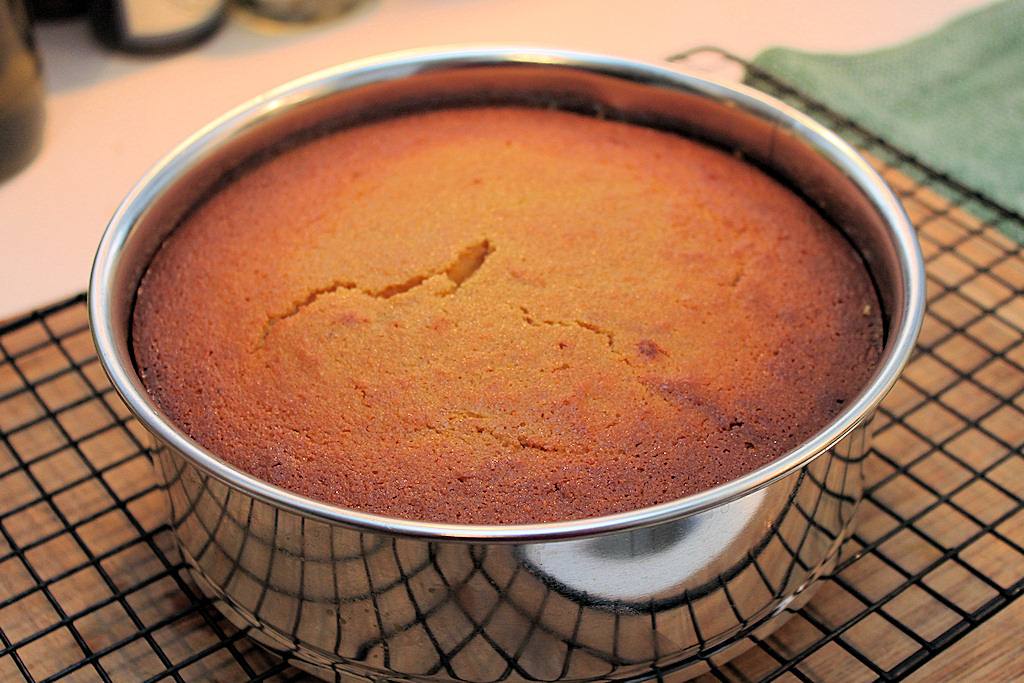
The good news is that I had absolutely no reason to freak out. This is one fine and delicious cake.  The liquid that comes out of the baking apples mixes with the batter to make an apple-y, custard-y delight.

This is the first recipe I chose to make from Ms. Greenspan's book, "Around My French Table: More Than 300 Recipes from My Home to Yours", but it is definitely not the last. I'm not the first to make and blog about this cake - or a host of other of Ms. Greenspan's recipes.
This is a recipe that Ms. Greenspan developed based on her friend, Marie-Hélène's cake and Ms. Greenspan encourages anybody who makes this not to futz with the recipe the first time around and I concur. There are so few ingredients that come together to make something so wonderful. Also, I think using several different types of apples is important in this recipe. I learned that same lesson about apple pie. When it comes to apple sauce (or apple butter) sticking to a single type is generally better.

Oh - and I think the addition of the dark rum is a key ingredient, if you have some. If not, brandy would do the trick.

The only quibble I had was (as I have had with other recipes) the old, "How big is big?" question when it comes to apple size. The recipe calls for four large apples of different types. I suspect that it's not a cooking crime with this recipe if your apples vary a little in size but I really had a wide range of apple sizes. I actually did some research on what is considered a large apple (*cough*NERD*cough*) and came up with a weight one-half pound (8 oz) per apple. Plus or minus a few ounces isn't going to hurt.


RECIPE: MARIE-HÉLÈNE'S APPLE CAKE
From Dorie Greenspan's book,  "Around My French Table: More Than 300 Recipes from My Home to Yours"
Makes 1 8" cake.
Equipment: baking sheet, 8" springform pan, parchment paper or silicone baking mat (Silpat)

Ingredients:
  • 3/4 cup all-purpose flour
  • 3/4 teaspoon baking powder
  • pinch of salt
  • 4 large apples, (2 lbs) of apples - choose different types if possible
  • 2 large eggs
  • 3/4 cup sugar
  • 3 tablespoons dark rum
  • 1/2 teaspoon vanilla extract
  • 8 tablespoons (1/4 lb) unsalted butter, melted and cooled + more to grease the pan
Preparation
Preheat the oven to 350F, rack in the middle.


Prepare for baking by lining a baking sheet with parchment paper or a silicone baking mat. Thoroughly butter an 8" round springform pan and place it on the lined baking sheet. I also covered the bottom of the buttered springform pan with parchment and then buttered the parchment. This makes separating the springform pan bottom from the cake a no-brainer.


In a small bowl, whisk together the flour, baking powder and salt and set aside.


Peel, core and cut the apples into 1-2" pieces. Uniformity of shape isn't important here.


In a medium bowl, beat the eggs until foamy. Pour in the sugar and whisk for about a minute, or until the sugar and eggs are blended then whisk in the rum and vanilla.


Whisk in one-half of the flour/baking powder/salt mixture, thoroughly incorporating it. Add half the melted, cooled butter and whisk. Add the remaining flour and butter mixing after each addition. The batter should be smooth and thick. It reminded me of waffle batter. Using a large spatula, fold in the apples, making sure that all of the pieces are thoroughly coated. Pour the batter/apple mixture into the prepared pan, scraping the bowl. Use the spatula to make sure the mixture is more or less even.


Place the pan (on the baking sheet) into the oven and bake for 50 - 60 minutes.  When you test it, use a knife and insert it deep into the center. It should be clean - or really, really close. The top will be golden brown and darker brown on the top edges. The edges will probably pull away a little from the sides of the pan. Transfer the cake pan to a cooling rack and let it sit for 5 minutes.


Use a blunt knife - or the non-cutting edge of a dinner knife - to run around the edge of the cake and loosen the sides of the springform pan. Open the pan slowly and make sure there aren't any apples stuck to the side. Continue cooling the cake until it is just warm or at room temperature.


Ms. Greenspan advises using a long spatula to remove the bottom of the springform pan (running it between the cake and the pan) and then inverting the cake onto the rack to remove the bottom. I found that if I line the generously buttered springform and then line the bottom with parchment and butter that, then the bottom lifts right off and the parchment paper liner does too.


This cake stores very well but store it on the counter and don't cover it - it's too moist to wrap up.
reade more... Résuméabuiyad

Sweet Sunday: Roasted Pear Tart

Once you've roasted pears that make their own caramel sauce (see: Roasted Caramel Pears with Crème Fraîche and Toasted Pistachios), it's a short, easy ride to make this roasted pear tart.


I used a sweet tart dough (from Mark Bittman's "How to Cook Everything Vegetarian" I highly recommend his cookbooks), 4 ounces each crème fraîche and fromage frais as the filling, drizzled the caramel sauce from the roasted pears over the fruit and garnished with toasted ground pistachios. All-in-all pretty simple. You can roast the pears the day before as well as make the tart dough and refrigerate that until the next day.

The assembled tart needs to chill in the refrigerator for a few hours before you serve it; the extra sliver I stashed in the refrigerator tasted great the next day, too. After chilling the tart, take it out of the refrigerator about an hour before serving.
Crème fraîche and fromage blanc, combined.
What is this "fromage blanc", you may ask? Fromage blanc is a creamy soft cheese made with cows milk. and not cream (like crème fraîche) and as Cowgirl Creamery makes it, it is what American grocery store cream cheese can only dream it could be but never will be. It has about 30% less fat than regular U.S. cream cheese and I think it's exponentially better. I wanted the tartness and rich, creamy taste of the crème fraîche to be there but not so forward. The fromage blanc was the perfect pairing. Look for it in your neighborhood from a good purveyor, buy and taste some and I'll bet you like it. A lot.

RECIPE: ROASTED CARAMEL PEAR TART

Serves: 8
Sweet Tart Shell recipe from: "How to Cook Everything Vegetarian", by Mark Bittman


CARAMEL ROASTED PEARS-------------------------------------------------------
Equipment: Refer to: Roasted Caramel Pears with Crème Fraîche and Toasted Pistachios
Ingredients:
  • 3/4 cups light brown sugar, lightly packed
  • 4 medium bosc pears, just ripe - at room temperature
  • 3/4 cups apple cider, or water (may not be necessary)
Preparation:
  • Follow STEPS 1 and 2 for roasting the pears in this recipe: Roasted Caramel Pears with Crème Fraîche and Toasted Pistachios
  • After the pears halves have cooled, remove them;  drain off and reserve the caramel sauce. Store the pears and sauce in separate covered bowls or containers. If you are making the pears the day ahead, store the pears and sauce covered, separately in the refrigerator in air-tight containers.
  • When you assemble the tart, the caramel sauce should be the consistency of warmed honey - viscous, yet free-flowing. If your sauce is too thin or thick, follow the recommendations in STEP 3 of  Roasted Caramel Pears with Crème Fraîche and Toasted Pistachios to make any necessary adjustments.
SWEET TART SHELL---------------------------------------------------------------
Equipment:  1 - 9" or 10" tart pan, a little flour in order to roll-out the dough, foil, a little butter to grease the foil  and 2 cups of raw rice, dried beans or pie weights and a pastry scraper to lift the dough. If you don't have a pastry scraper, you can use a length of dental floss and slide it under the dough to loosen it from your board.

Ingredients: Sweet Tart Shell
  • 3/4 cup all purpose flour
  • 1/2 cup ground almond meal (or other ground nuts)
  • 1/2 teaspoon salt
  • 2 tablespoons sugar
  • 10 tablespoons frozen or very cold butter, cut into 1/3" chunks
  • 1 egg yolk
  • 3 tablespoons ice water (more or less may be required)
Preparation: Sweet Tart Shell
  1. In the bowl of a food processor, add the flour, salt and sugar. Pulse once or twice to combine. Add the chilled or frozen butter all at once and process until the mixture is uniform (no more than 10 seconds). Add the egg yolk and process for 4 more seconds.
  2. Remove this mixture to a bowl and add the ice water until you can form the dough into a ball. If it's too dry (the dough ball cracks or doesn't hold together), add more ice water 1 tablespoon at a time.
  3. Form the dough into a ball, slightly flattened, wrap tightly in plastic and chile in the refrigerator for  at least 1 hour. You can refrigerate up to a couple of days, or freeze for up to a couple of weeks.
Rolling-Out and Pre-baking the Tart Shell
  1. If the dough was frozen, remove the dough - the day or night before you plan to assemble the tart - to the refrigerator. When you remove the dough from the refrigerator bash it gently just enough (not like you're swinging hammer!) 4 to 6 times in order to be able to roll it out.
  2. Lightly dust your surface with flour place the dough on the surface and roll in one direction, making a 1/4 turn after each roll until the dough is 2" in diameter larger than your tart pan. If your dough is sticking to the rolling surface, pick up the dough (this is where the pastry (or bench) scraper or length of dental floss may comes in handy) on each side and dust your surface with a little flour.
  3. Drape 1/2 of the dough over the rolling pin (again, have the pastry or bench scraper or dental floss nearby) and place it on top of the tart pan, centering it.
  4. Press the dough into the pan gently, including all of the nooks and crannies. If there is some cracking, or thin parts, patch with dough scraps being careful not to make your patched areas thicker than the rest of the the dough.
  5. When you are done, use a knife to cut-off the excess. 
  6. Wrap the tart pan with plastic wrap and refrigerate for 1 hour. I have tried freezing the tart dough for 30 minutes, but my tart shells tend to shrink when I use that method, but not when I refrigerate the dough for an entire hour - or up to two hours. If you're in a rush and cannot wait for an hour, wrap and freeze the dough for 30 minute and accept the shrinkage.
  7. While the dough is chilling down, pre-heat the oven to 425F, rack in the middle. When the oven has pre-heated, remove the tart pan with the dough from the refrigerator and remove the plastic wrap. Prick (dock) the dough all over with a fork, evenly spaced (10 to 15 times). .Butter a length of foil and place it into the pan butter side down on top of the dough pressing very gently to get it into the shape of the dough in the pan. Place the pie weights (raw rice, dried beans or pie weights) on top of the foil.
  8. Place the prepared tart shell on the middle rack and bake for 12 minutes. Remove the tart pan from the oven and remove the foil and the weights. Return the tart shell to the oven, reduce the temperature to 350F and continue to back until the crust is entirely golden brown as this tart recipe requires no additional baking.
  9. Cool the tart shell  completely on a wire rack (in the tart pan) before assembling the tart.
TART FILLING--------------------------------------------------------------- 
Ingredients:
  • 4 oz crème fraîche
  • 4 oz fromage blanc (substitute: whole milk ricotta, beaten smooth or cream cheese)
Preparation:
Combine crème fraîche and fromage blanc until smooth and homogenous

GROUND OR CHOPPED PISTACHIO GARNISH-------------------
Ingredients: Pistachio Garnish

ASSEMBLING THE TART---------------------------------------------------------------
Have ready:
  • Pre-baked and cooled tart shell
  • Crème fraîche and fromage blanc filling
  • Roasted pears and caramel sauce
  • Ground or chopped pistachio garnish

  1. Spread the filling in the tart shell
  2. Slice the roasted pears into 1/4" vertical slices and arrange, starting at the outside, in circles on top of the filling.
  3. Drizzle around 1/3 cup of the caramel syrup evenly over top of the roasted pear slices
  4. Garnish with the toasted, ground or finely chopped pistachios
  5. Wrap the tart with plastic wrap and chill in the refrigerator for a couple of hours. Remove 1 hour before serving to come up to room temperature.
reade more... Résuméabuiyad

Roasted Caramel Pears with Crème Fraîche and Toasted Pistachios

Want to make a dessert that's dead easy and delicious, where the main part of the dish is comprised of two ingredients (pears and brown sugar) and makes it own sauce? Well, this just might be the one.

Lynn and I saw this on one of Joanne Weir's cooking shows and looked up the recipe on her site. We made it for my birthday dinner and periodically rave about it. We're making it as a Thanksgiving dessert, in lieu of pie, because we never seem to get to the pie on Thanksgiving.

For this recipe, I used crème fraîche instead of the called-for Marscapone, omitted the honey and used toasted, ground pistachios instead of pecans. I like the slight sour-ness to the crème fraîche, I think adding honey to it is overkill and toasted pistachios give a little crunch, texture and nutty flavor to the dish.

This is not a regular "Sweet Sunday" recipe, but I used the pears for a "Sweet Sunday" tart recipe that will be posted very soon.

Selecting Pears & Pear Care

The original post from which I adapted this recipe calls for Bartlett pears. For my version, I chose Bosc pears. Bartlett pears will release more liquid and be much softer when completely cooked. Just make sure they are barely ripe when you're ready to prepare your dish or your roasted Bartlett pears will be mushy.
Bosc pears have a golden brown, matte and somewhat rough-feeling peel.
 I know there are other baking-appropriate pears out there, but I chose Bosc pears. They don't have the gold-and-rosy sexy blush of Bartlett and other pears but they are a workhorse when it comes to baking. When ripe, they are firmer than most other eating pears. To test for ripeness, press gently near the stem and if it gives to that gentle pressure, it's ready to use. Ripen pears in a warm, room temperature place outside of the refrigerator and test daily for ripeness. Once ripe, store in the coldest spot in the refrigerator, uncrowded and in a single layer - but not in the crisper, they are too easily bruised.

Because pears ripen from the inside out, ripe fruit will give gently to gentle pressure near the stem. Waiting until pears are soft around the middle may indicate over ripeness.

Toasting Pistachios

I read about a technique to toast pine nuts on Alton Brown's blog using the microwave and a paper bag. Although it worked - and I have ruined many a batch of pine nuts by being distracted for just a few seconds too many - the pine nuts were too uniform in color for me (yeah, I'm weird) and I think too much salt clung to them for my taste. I'm going to try it again with a shorter time in the microwave and less salt.
Raw, shelled pistachios, pre-toasting.

However, I love it for toasting pistachios and I used less salt than when I used this method for pine nuts and I was very happy with the results. The pistachios are just lightly toasted (retaining their beautiful color) and lightly salty. This method can be found below the main recipe for the roasted pears.

RECIPES:
 - ROASTED CARAMEL PEARS with CRÈME FRAÎCHE and PISTACHIOS and
 - MICROWAVE TOASTED PISTACHIOS

Serves 6 (smaller pears, 2 per person)
Adapted from Joanne Weir

Equipment 13" x 9" baking dish, 1/2 teaspoon measuring spoon (for coring the pears), peeler or sharp paring knife. If your pears are big enough that they will crowd a large baking dish, a roasting pan or a rimmed (jelly roll) baking pan will work. If you use a jelly roll pan, you will need to take more care when pouring out the sauce - grab somebody to help you if necessary.

Ingredients:
  • 1 1/2 cups light brown sugar
  • 6 medium pears, just ripe - at room temperature (Bartlett - red or gold, or Bosc. See notes above on ripeness and storage)
  • 1 to 1 1/2 cups apple cider, or water (may not be necessary)
  • 8 oz crème fraîche
  • 1/2 cup whole, raw pistachios, toasted, lightly salted and chopped (see toasting method, below)
Preparation
Pre-heat oven to 350° F, rack in the middle
  1. Spread the brown sugar in an even layer in the baking dish. Peel, halve and core the pears (use the 1/2 teaspoon measuring spoon to remove the seed core and the flower end on the bottom of the pears). Lay the pears cut-side down on top of the brown sugar layer in the baking dish. It should be a tight-fit with all the pears.
  2. Bake for approximately 35-45 minutes. The pear juices and the brown sugar will form a light caramel syrup. A paring knife should slide easily in and out of the pears. Check the pan every 5-10 minutes and if the pan is dry, add 1/4 cup apple cider or water to dissolve the sugar. Turn the pears over and roast an additional 5-10 minutes. When they are done, remove the baking dish from the oven and let cool for 10 minutes. 
  3.  If the sauce is too thin, remove the pears to a platter and cover with foil to keep warm. Pour the sauce into a sauce pan. Adjust the heat to medium or medium high, bring the sauce to a simmer and adjust the heat to keep it at a simmer while it reduces. Make sure your sauce pan is at least 2 quarts, as the sauce may bubble. When the sauce is the consistency of warmed honey (viscous but free-flowing), remove from the heat an allow to cool while you plate the pears. (Note: if the sauce is too thick, add 1/4 cup -or more if necessary - of warmed cider or water to the baking dish and stir to incorporate all of the caramel sauce. Reheat in a sauce pan over medium-low heat if desired)
  4. Place 2 pear halves in each of 6 bowls with one pear half cut-side up. Drizzle a couple of tablespoons of the sauce around the outside of the pears. Top each serving with a dollop of crème fraîche and sprinkle each serving with some of the toasted and chopped pistachios.
RECIPE: MICROWAVE TOASTED PISTACHIOS
Adapted from Alton Brown's "Pine Nut Primer"


Remember -- your microwave may differ in power settings from mine so check for doneness often and remember that even when you're done, the nuts will continue cooking for a minute or so.


Equipment: microwave oven, a small paper lunch bag, water, small strainer.

Ingredients

  • 1/3 cup shelled, raw pistachios
  • 1/8 teaspoon kosher salt
Preparation
Soak the pistachios in water for about 10 seconds. Strain off the water. In a bowl, toss the pistachios with 1/8 teaspoon kosher salt and place them in the bottom of the small paper lunch bag. Fold over the top of the bag a couple of times.

Microwave on high for one minute. Shake the bag a once or twice and test a nut for doneness. If necessary, microwave in 10 second increments (my 1/2 cup took 1 minute, 20 seconds in total). Pour the nuts on a plate or into a bowl to cool down a few minutes. Use as indicated.

    reade more... Résuméabuiyad

    Sweet Sunday: Lime Coconut Bars


    This is a riff on Mark Bittman's recipe in "How to Cook Everything" called, "Gabriella's Lemon Squares" and while they weren't picture perfect coming out of the pan, they sure did taste good. I love unsweetened, toasted coconut's nutty naturally sweet flavor.


    Actually, I think my problems getting them out of the pan could have been solved by using a metal baking pan with square corners and lining it with well-buttered parchment paper as I don't think the Pyrex pan's rounded corners did me any favors. Next time  - and oh my friends, there will definitely be a next time - I won't spread the coconut up the sides as it made cutting the bars more difficult. With the coconut on top, it's easier to start your cuts in the middle of the pan and work out towards the edges. I even think a metal pastry scraper with a straight edge would work well.


    The original recipe did not call for zest, but I added that to both the crust and the filling as well as upping the lime juice to 1/3 cup.


    Oh - and let's just get this out of the way. I know some of you have already thought of this and those who haven't, I want to share this with you because I had this song in my head the entire time I was cooking as well as the time it took to write this post!


    ... aaaaaand you're welcome!

    RECIPE: LIME COCONUT BARS


    Adapted from Mark Bittman's "Gabrielle's Lemon Square" from "How to Cook Everything"
    Makes 16 2" x 2" servings

    Equipment:
     - 8" or 9" square pan. Check both the crust and filling earlier if using the larger size. I think a pan with square corners works best.
     - Parchment paper
     - Cooling rack

    Notes:
     - Be careful not to over-bake the filling. The edges should feel firm (but not hard) and the middle should still be a little soft. If the coconut's not browning evenly, rotate the pan.
     - If your butter is too hard and you're in a rush, cut it up into cubes, put the cubes between 2 layers of plastic wrap and bash it with a meat tenderizer (smooth side) or a rolling pin.

    Ingredients:
    • 1 stick softened butter (8 tablespoons) + more to grease the pan
    • 1 3/4 cups granulated sugar, divided
    • Pinch of salt
    • 1 cup + 3 tablespoons all-purpose flour
    • Grated zest of 3 limes, divided
    • 3 large eggs
    • 1/3 cup freshly squeezed lime juice
    • 1/2 teaspoon baking soda
    • 1 cup of unsweetened, grated coconut
    Preparation:
    Pre-heat the oven to 350F, rack in the middle
    Grease an 8" or 9" square baking pan with 2 teaspoons of butter and line with 1 sheet of parchment paper. Butter the top of that sheet with 2 teaspoons of butter and then lay a second sheet over the first. Cut the sheets large enough so that the side rise above the rim of the baking dish. These bits will act as handles to help you remove the lemon square from the pan. Set the pan aside.

    With an electric mixer, cream 1 stick softened butter with 1/4 cup of the sugar, the zest of 1 lime and the salt. Stir in 1 cup of flour. This should be a dry-ish mixture. Press into the prepared pan and bake for 20 minutes. It should just be turning golden. Remove from the oven and cool for about minutes. Leave the oven on.

    In a clean bowl, beat the eggs, lime juice, the zest of 2 limes and the remaining 1 1/2 cups sugar until the mixture is light and thick. Add the remaining 3 tablespoons of flour, baking soda and mix until combined. Pour this mixture over the crust and sprinkle 1 cup of the unsweetened, grated coconut over the top. Try not to pile the coconut up on the sides as it will be harder to make clean cuts. 

    Bake until the edges are firm but the center is still a little soft for 25 - 30 minutes. Check at 15 minutes if you are using the larger size (9") pan. If the coconut is browning unevenly, rotate the pan.

    When done, cool completely and cut into 2" squares (or whatever size you wish) and serve. This can be stored, covered, in the refrigerator for 2-4 days. Bear in mind that the coconut will lose a little of its crispness if stored, but it will still taste great. Let them come to room temperature before serving if you do store them in the refrigerator.
    reade more... Résuméabuiyad

    Sweet Sunday: Orange Ginger Torte: A Long Post for a Short Recipe

    Murcott Tangerines
    !WARNING!: this is a long post. You can skip down to the jump for the recipe. Or read on for:
    1. How I will manage to make baked goods and desserts on a weekly basis without guilt; and
    2. How I tussled through two iterations of possibly one of the shortest recipes other than, "Apple: wash, eat".
    Torte Version #2 Plated: Made with Murcott tangerines. The only sugar I had was an organic unrefined,
    unbleached, cane sugar which produced a deeply browned exterior. It also photographed a little darker than it actually looked.

    Consider the following:
    • I am much more confident in my savory cooking than in baking or desserts and I would like more practice, but... 
    • I should not have left-over desserts or baked goods, hanging out in my house and calling to me like the Sirens
    What to do? Until now, I'd only make desserts for a dinner party or other special occasion and send left-overs home with guests. A few weeks ago I had an ah-ha moment: the church a friend of mine attends serves food after services. A few years ago, I sent a test batch of vegan, chai cupcakes along with her (they liked them). A few weeks ago I asked her if I could make a dessert at the end of the week and send everything with her except for a serving for me to taste (and one for her). Eureka!. Now we have "Sweet Sunday".
    Torte Version #1 Plated: This was made with regular white sugar and glazed with a thin mixture of
    orange zest, orange juice and sugar.
    Unlike savory cooking where I'm generally fearless and understand what's going on and why something works (or doesn't), I don't have that deep experience with desserts and baking. This means more copious head notes in my posts (as if I weren't wordy already!) which I hope are helpful for at least some who read. If it's all old hat to you, just nip on down to the jump link and go right to the recipe.
    Torte #1 after an hour of baking. Looks fine on the outside, but the interior was mushy, still.

    For the first round of Sweet Sunday, I made an orange ginger torte which has a very sexy, seductive aroma and taste. It has a short list of ingredients: oranges, eggs, sugar, almond meal, ginger (both fresh and candied) and baking powder. I ended up making it twice. The first time the end result, once I got through all of the trials and tribulations, tasted good, but I couldn't post it until I addressed the issues and questions I had or at the very least understood why I ran into problems and made it a second time with adjustments, and I will definitely make it again. I'll note this again in the recipe, but I really think this torte tastes better after the first day and on the third day it was even better - just wrap tightly and store in the refrigerator.

    #1: How BIG is Small? ...Because Size Does Matter
    • After I made it the first time the first thing I came to learn was that your idea of a small, medium or large orange may differ from mine and this is a perfect example of why weight is a better way to measure, especially in baking. The recipe called for 2 large or 3 small oranges. I had several Moro blood oranges and 3 of them that I considered small. The cake took two hours to fully cook instead of the one called for in the recipe. After the first hour, the insides were like oatmeal. I emailed the author (Clotilde Dusoulier of "Chocolate & Zucchini" fame - a very good blog, full of delicious, interesting recipes and good information) and she was gracious enough to update the recipe with the weight (1 1/3 lbs for the oranges) and also give a really useful description of how the crumb should appear in the post's comments. She has been blogging for years and her site and recipes are very popular - for good reason -  so there are generally many comments per post. Not all bloggers respond to questions, but she does - and did respond to mine even though the original post was from 2004!
    #2 The Right Citrus for the Job
    • I did some research and found that most of the similar recipes were called "Clementine Cake"  and generally called for Clementine oranges (a mandarin hybrid).  Also, I think blood oranges aren't my preferred choice for this torte. They often are a bit dear and I think the special taste and aroma qualities of a blood orange is lost in baking - at least in this torte. When you get your hands on a good blood orange, it is a wonder and not just for the beautifully hued flesh and peel. I can find essence of roses and other floral aromas in the flesh and they are wonderfully juicy.
      Torte Version #2: The recipe from which I started called for a topping of pearl sugar combined with lemon juice and zest. I opted for a glaze made with powdered sugar, orange juice and zest, topped with toasted almonds.

      I think this cake tastes better using an orange with less pith. Less pith=larger ratio of flesh and outside skin (zest) to pith. The second time around, I used 1 1/4 lbs of Murcott tangerines. Murcott tangerines are marketed in some areas as "Honey Tangerines" and are sometimes called Murcott Mandarins (see: UCR College of Natural and Agricultural Science's Citrus Variety Collection- I love this reference site). They are delicious to eat with a bright, sweet flavor and a great aroma. I rarely encounter a seed but cut mine in half horizontally to look for any before I pureed them. I think any thin-skinned mandarin or tangerine with great taste and a thin pith would work just fine.
    #3 What is it supposed to look like?
    • Ms. Dusoulier's comment, "...one thing I want to note is that this cake remains a very moist one, even when fully baked. The crumb should feel like it's been soaked in syrup" was so helpful because I wasn't sure. I know tortes made with nut meals or flours will not have the same kind of crumb as a cake or quick bread, but I really didn't know what to expect. Her comment made perfect sense to me and I knew, for my second go-round that it was properly finished.
    #4 One last thing - I swear it's the last note.
    • The first time I made it I used a coarse-ground almond meal and the second time, I used a fine-ground almond meal - more flour-like. I didn't see an appreciable difference so use what you have or can get your hands on. I used Bob's Red Mill almond meal both times. 
    On to the...
    RECIPE: ORANGE GINGER TORTE
    Makes 1 8" cake
    Equipment: 1 8" spring-form pan. I've seen similar recipes where a 9" spring-form pan was used with nearly identical ingredients, but make sure you check the cake at 30 minutes.

    Notes: 
    • I did not have any candied ginger and used more fresh ginger than was called for. I grated about 2/3 of the fresh ginger on a microplane and the remainder on the large-hole side of a box grater and really liked the occasional extra ginger-y punch.
    • This cake is very moist and the crumb should appear as if it's soaked in syrup. It keeps beautifully in the refrigerator. Wrap it very tightly in plastic wrap and bring it to room temperature before serving. I think it just gets better on the second and third day.
    • Even after adjusting the amount of orange, the cake still took 80 minutes instead of the 60 specified in the original recipe.
    Ingredients
    • 3 small / 1 1/3 lbs oranges (2/3 kg) (Clementines or Murcott tangerines), preferably organic
    • 6 large eggs
    • 1 1/4 cups (8 3/4 oz or 250 grams) sugar
    • 2 1/3 cups (8 3/4 ounces or 250 grams) almond meal (fine or coarse grind)
    • 1 3-4" piece of ginger, approximately 1" in diameter
    • 1 teaspoon baking powder
    • Scant 1/4 teaspoon salt
    • butter to grease the spring-form pan
    Preparation
    Preheat the oven to 375F / rack in the middle
    • Wash the oranges well and remove the little green stem-end if it is there. Place them in a deep 2-3 quart, saucepan and cover with water + an extra inch. Place the sauce pan on a burner set to medium-high heat. Bring to a boil, reduce the head and simmer for two hours, adding boiling water if necessary to keep the oranges covered. Drain and cool completely. Cut into quarters (over a bowl) and check for seeds. Puree until completely smooth in a food processor and set aside.
    • Using a microplane grater, grate 2 1/4 " of the fresh ginger into a large bowl. Using the large holes on a box grater, grate the remaining ginger. Add the eggs and beat lightly with a fork. Whisk in the orange puree, the sugar, the almond meal and the backing powder until all the ingredients are thoroughly combined.
    • Pour the batter in the greased spring-form pan. Bake for 40 minutes and check. If it is getting too brown, cover the top with a piece of foil. Continue to cook for 1 hour or if necessary, longer. Cook in additions of 10-15 minutes and check after each period. You should be able to stick a toothpick or slim skewer into the cake and just see a few crumbs when it's done. If it gets too brown on top, cover it with foil and continue.
    • When complete, let the cake cool on the rack for 5 minutes. Run a knife (I use a very flat, plastic spatula to avoid scratching the pan), loosen the outer round and remove it. Allow the cake to rest on a rack until completely cooled.
    • To keep, wrap it tightly in plastic wrap and store in the refrigerator. Serve at room temperature.
    reade more... Résuméabuiyad

    Tayberry Cornbread


    I saw a recipe for Blueberry Cornbread in the weekly newsletter from CUESA (the Center for Urban Education and Sustainable Agriculture) - the folks who make the San Francisco Ferry Plaza Farmer's Market happen - and bookmarked it immediately.

    Odd, because 99% of my cooking is savory and I tend to avoid having desserts around unless I'm going to distribute all but a serving to others. I'm no saint, and I'm very well acquainted with my weaknesses - but this dish spoke to me. I like that it does not have much sugar and there was something about that juicy, bubbly fruit nestled in the  cornbread that I could not resist.

    ...and I had tayberries that weren't getting any younger. Tayberries are a cross between a logan berry (itself a cross between a blackberry and a red raspberry) and a black raspberry, developed in Scotland in 1979. It is a very fragile berry when ripe and I've never seen them in the grocery store. The taste is a bit more wine-y and a lot more subtle than a raspberry and I absolutely love them. They make a fantastic jam - even a little sugar makes the already lovely flavor intensify exponentially.  Normally, I buy them in smaller quantities and just eat them (my default mode for summer fruits).

    I purchased them on Saturday and by Sunday I knew I'd have to either make something, eat them all or risk them developing mold - even in the refrigerator stored in as shallow a layer as possible to keep them from being crushed.

    One note: I used the cornmeal that I had in the pantry - a coarse grind that is better suited to a hearty polenta than to this cornbread. I will use a fine grind the next time. I think it affected my batter and cooking time (it took about 12 more minutes to cook than the recipe specified).

    Blueberries, blackberries, raspberries - any juicy berry will do the trick if you don't have access to tayberries. And definitely cook it in a cast iron skillet if you have one - I love the way the crust turns out. If not, a Pyrex 8" square casserole will do the trick.

    Oh - I used twice the amount of berries called for - very smart move on my part.
    The remainder are wrapped tightly as individual servings in the freezer but I ate every last speck of the serving I had. I think this dish would make a great base for a shortcake-type dessert. A square split horizontally would not be perfect due to the clumps of berries but who cares about perfection when it's topped with more tayberries lightly sugared and just slightly macerated under a dollop of whipped cream and more berries?

    Recipe: Tayberry Cornbread


    Adapted from Kimberly Hasselbrink's (The Year In Food) adaptation of a Sunset Magazine recipe.

    Yield: about 9 servings


    Ingredients:
    1 cup buttermilk
    2 large eggs
    4 tablespoons butter, melted, divided
    1 1/3 cups cornmeal
    2/3 cup all-purpose flour
    1/4 cup sugar
    1 1/2 teaspoons baking powder
    1 teaspoon sea salt
    2 cups fresh tayberries, divided (...or blueberries, raspberries, blackberries...)

    Method:
    • Preheat oven to 375 degrees - oven rack middle.
    • In a large mixing bowl, whisk together the eggs, buttermilk and 3 tablespoons of melted butter. In a separate bowl, combine cornmeal, flour, sugar, baking powder and salt. Fold dry mixture into wet. Gently fold 1 cup berries into the batter.
    • If using a skillet, warm it over a low flame and pour the remaining tablespoon of butter in the skillet – enough to coat. If using a 8" square Pyrex baking dish, pour the remaining tablespoon of butter in the backing dish and use a pastry brush, or crumpled piece of paper towel to butter the inside of the dish.
    • Pour batter into skillet. Distribute the remaining 1 cup of berries over the top of the batter and push them down into the batter, but leave a little showing on top.
    • Bake at 375 degrees for about 20-25 minutes, until a toothpick inserted in the center comes out clean.
    • Remove from oven and let cool for 10 minutes. Cut into 9 wedges (round skillet) or squares (8" square pyrex)
    reade more... Résuméabuiyad