Pages

.

Showing posts with label pork. Show all posts

Friday Dinner: the Amazing Macaroni and Cheese, Oven Ribs and Creamy Coleslaw


I don't make mac and cheese or any pasta at home, nor do I order it in restaurants. Why? Because the angel on my shoulder reminding me that, "It's not as much about what you eat, it's about portion size." gets smacked into oblivion by "want". However, Friday dinners cooked with my amica in cucina, Lynn are the exception and boy-oh-boy this mac and cheese was fun, easy and delicious.


We compare notes on cooking shows we've watched, or recipes found and this one (Maccheroni al Formaggio) came from Lidia Bastianich and Tanya Bastianich Manuali's cookbook, "Lidia's Italy in America". I don't post recipes if they are not original, unless we've made significant changes in ingredients, preparation or sometimes both. With the exception of the cheeses and our choice of pasta (shells over the recipe's called-for "pipette"), we made this exactly as written, cutting the amounts in half.

Generally, when we find a new recipe, we do some research but we've never been steered wrong by Lidia - "In Lidia We Trust".


Why did we get so excited about this recipe? There is no Mornay sauce (a béchamel or "white sauce" to which grated cheese is added). The sauce is cheese, milk and two sage leaves. I've seen references to this type of sauce, but hadn't seen any recipes. Another big plus is the topping. Day-old Italian (we used a baguette) bread is hand-grated using the large holes of a box grater, lightly toasted in butter, cooled completely and the crumbs are combined with Grana Padano or Parmigiano-Reggiano (we used Romano) cheese. The variation in the crumb size really contributes to the topping's crunchiness.

Oven Ribs and Creamy Coleslaw - oh yeah, we did have a couple of other dishes and they were delicious, too. Lynn made a rub with brown sugar, paprika, onion, garlic, salt and thyme, rubbed down the ribs (1 rack of pork spareribs), wrapped them and refrigerated them for 24 hours and then we cooked them, covered in foil with a little white wine in the bottom of the baking sheet for 3 hours at 250 F, then broiled them for a total of 5 minutes right before serving. We made Al Bergez' sauce to accompany the ribs.

My creamy coleslaw dressing wasn't too creamy or sweet (I never add sugar to my coleslaw dressing) and one important thing to remember - unless you like too much dressing - is to under-dress the coleslaw and let it rest in the refrigerator for a couple of hours. The moisture released from the coleslaw as it breaks down a little will add to the dressing and the salad remains crunchy without a soupy mess of dressing in the bottom of the bowl.

RECIPES: MACARONI and CHEESE and CREAMY COLESLAW

MACARONI and CHEESE
Maccherone al Formaggio from Lidia Bastianich and Tanya Bastianich Manuali's cookbook, Lidia's Italy in America

Notes: We made a half-recipe and this could serve 4-6 as a side or 4 as a main dish. We used shells and the three cheeses we used were American Sharp Cheddar, Consider Bardwell Farm's "Pawlet" (purchased at Cowgirl Creamery) and Romano.

COLESLAW with CREAMY DRESSING
Serves 4 as a side.

Ingredients:

  • 1/3 large head green cabbage, sliced very thin (1/8" to 1/4")
  • 1 medium carrot, grated
  • 1 rib celery sliced thin
  • 2 green onions, sliced thin
  • 2 tablespoons white or white wine vinegar
  • 2 teaspoons Dijon mustard
  • 1/2 teaspoon celery seed
  • 1/2 teaspoon + a couple of pinches of salt
  • freshly ground black pepper
  • 1/4 cup mayonnaise
  • 1 tablespoon sour cream

Preparation:

  • Combine the prepared cabbage, carrot, celery and green onions in a large bowl. Season with 2 pinches of salt and toss.
  • In a small bowl (1 quart) add the vinegar, Dijon mustard, celery seed, 1/2 teaspoon salt and ground pepper to taste. Whisk to dissolve the salt. Add the mayonnaise and sour cream and whisk until fully homogeneous.
  • Add the dressing to the salad in the larger bowl. Toss to combine. Cover and refrigerate for two hours before serving. Remove from the refrigerator 30 minutes prior to service, taste and, if necessary, adjust the seasoning.
reade more... Résuméabuiyad

Roasted and Stuffed Prosciutto-Wrapped Pork Loin, No-Name Potatoes and Citrus Salad

I swear that this is (probably nearly) the last post for things made in 2011, but it's a great dish that we made for our 2011 New Year's Eve dinner. We'd been planning to make this pork loin roast since October 2011 when Lynn saw it in Bon Appetit. None of the components are difficult for the pork loin but there was a serious error in the original recipe when it came to cooking temperature and time - which I address in the recipe's head notes after the jump. 
Fortunately, others had gone before and there was very good information in the reviews. Ours looked like the roast in the magazine's picture and tasted like something you'd gladly open your wallet to pay for in a restaurant. It was all kinds of awesome.
A pork loin is butterflied, a layer of pre-wilted kale is spread on top, and on top of that a mixture of pork sausage, reconstituted dried mushrooms and apples, thyme and rosemary. The loin is then rolled and wrapped in a layer of prosciutto, tied and garnished with rosemary, browned briefly and roasted.
I was at Sur La Table looking to buy some kitchen twine because Lynn was out. All they had were ridiculously expensive (and small) packages of kitchen twine and these re-usable silicone bands for about the same price.  I have poo-pooed these in the past because tying your own roast or other cut of meat when called for is something you should know how to do.  However... the bands work beautifully, are easy to remove and easy to clean. These bands wouldn't work for every application, but they were perfect for this roast. Yay, technology!
Hello luv-ah!

I can't figure out what to name the potatoes. The closest I've come is "French-Fried Potato Columns" (not entirely accurate and kind of uninteresting), or maybe, "Potatoes Cooked Three-Ways". Ugh. My sister Chris served these a couple of years ago for our family's Christmas Eve dinner and I've been periodically obsessing over them since then.They taste  like french fries on the outside (but are not deep fried) and inside, but are approximately 2" high by 2 to 3" diameter "columns" and so there is a lot of fluffy potato in the middle. I don't eat potatoes very often and when I finally got around to asking her how she made them she didn't remember, didn't know where she'd found the recipe or even if there was a recipe. My research proved fruitless - I couldn't find anything exactly like what I remembered.
The potato "columns" drying after being boiled. After they've dried, the tops and bottoms are sauteed until they're a deep golden brown and then they're popped in the oven for about 15 minutes..

When we were out picking up the roast at Tacoma Boys (on 6th Ave. - great store) and other ingedients for the 2011 Christmas Eve dinner, I cornered her in the cracker aisle and wouldn't let her leave until she'd remembered how she made them. Which she did. I made a test batch for my sister Sara's family and got a unanimous thumbs up.
.The citrus salad was all Lynn's idea: a variety of greens, grapefruit supremes, toasted pecans and avocado in a grapefruit and Sherry vinegar vinaigrette. It was a perfect balance to the rich pork.

It was truly a wonderful way to mark the end of 2011.

RECIPES (after the jump):
- Roasted and Stuffed Prosciutto-Wrapped Pork Loin
- No-Name Potatoes
- Salad with Grapefruit, Toasted Pecans, Avocado and a Grapefruit Vinaigrette

Stuffed Pork Loin Wrapped in Prosciutto
 - From Bon Appetit (October 2011) Prosciutto-Wrapped Pork Loin with Roasted Apples
 - Serves 6-8

Notes: The recipe in Bon Appetit instructs you to cook the prepared pork loin at 400F for about 1 hour and 40 minutes (internal temperature of 140 F). Many reviewers indicated that this was too high and too long a cooking time. We adjusted the heat to 350 F and ended up cooking it for 1 hour 35 minutes. I checked the temperature with an instant read thermometer at 45 minutes and thereafter after 30 minutes, 20 minutes and, finally, 10 minutes where the temperature in the middle was 142 F - perfect! If you use a smaller pork loin (ours was 3.5 pound) your cooking time will vary so use the internal temperature as your guide.

Although both Lynn and I have butterflied meat enough to be comfortable doing it ourselves, I asked a butcher at my go-to meat market (Golden Gate Meat Company at the Ferry Plaza) to butterfly it for me. If you do it yourself, it's not hard, it just needs your attention. I know there are videos out there to be watched. Try to keep it at least 1/2" thick as you cut and unroll it. A little thicker it okay - you're going to pound out the thick parts after you butterfly it. Hone your knife first. I like using a boning knife or a 6" not-too-wide chef's knife for this.

I would definitely add some sauteed and caramelized mushrooms to the filling next time and any juices from de-glazing that pan to the liquids for the roast. I think there would be more shroom-y flavor. Another addition I'd consider is to dice a little prosciutto and use the rendered fat to cook the onions, adding the cooled prosciutto bits to the stuffing - but this dish is delicious as written.

Ingredients - Filling
  • 1 ounce / 1 cup dried porcini mushrooms (you could substitute shitakes)
  • 2 ounces / 3/4 cup dried apples
  • 1 lb kale, washed with stems removed (check this out for an easy method to de-stem kale)
  • 2 teaspoons kosher salt + more
  • 2 tablespoons unsalted butter
  • 1 cup medium minced onion
  • 1 tablespoon finely minced garlic
  • 1 1/2 teaspoons dried thyme
  • 1 1/2 teaspoons dried crumbled rosemary
  • 2 tablespoons brandy (or Calvados)
  • 1/2 teaspoon freshly ground black pepper
  • 1 lb ground pork
Ingredients - Pork Roast
  • 1 trimmed 3.5 lb pork loin, butterflied
  • 1 teaspoons kosher salt + more for seasoning
  • 3 ounces thinly sliced prosciutto
  • 5 sprigs of rosemary
  • 4 medium apples (we used Fuji's, but Granny Smith would work, too), quartered. If small, just cut in half and core out the seeds with a melon-baller or a 1-teaspoon measure.
  • 3 tablespoons unsalted butter, divided
  • 2 tablespoons extra-virgin olive oil
  • 1 cup hard, dry cider
  • 1/2 cup low-sodium chicken stock or broth
Preparation - Filling

Place the dried mushrooms and dried apples in separate heat-proof bowls. Add 1 cup of boiling water to each bowl. Let the mushrooms and the apples soak until very soft, about 1/2 hour. Drain mushrooms and reserve the soaking liquid and make sure that when you pour it off, you leave any grit from the mushrooms in the bottom of the soaking bowl. Drain the apples and discard the soaking liquid. Finely chop the mushrooms and apples. Combine in a small bowl and set aside.

Place the prepared kale in a large microwave-safe bowl or Pyrex baking dish. If your kale has dried off completely after being washed, toss it with a little water. Microwave it on high one minute at a time, tossing with tongs until the kale it wilted - about 3-4 minutes total. Drain off any excess water and refrigerate until cool.

Heat a large skillet over medium heat, add the butter and when the milk solids have stopped foaming add the onion until it's software and just golden brown. Add the mushrooms and apples. Cook about 1 minute, stirring occasionally - about 5 minutes. Stir-in the garlic, thyme and rosemary and cook for 1 minute. Take the pan off of the heat and add the brandy. Return the pan to the head and cook until the liquid is fully absorbed and reduced, about another minute. Taste. Add about 1 teaspoon salt and 1/2 teaspoon pepper and combine and cook for another 30 minutes. Re-taste and add the remaining teaspoon salt if necessary.

Transfer the mixture to a bowl. When the mixture is completely cool, add the ground pork and stir to combine well.

Preparation - Pork

If you are butterflying the pork loin: If your butcher did this for you, skip to the next paragraph. Place the pork loin on the cutting board at a 90 degree angle, with the short end facing you. Place your non-cutting hand on the top of the roast. Use a sharp knife (you did remember to hone your knife, yes?) and make a vertical cut about 1/2" above the underside of the of the loin and about 1" into the roast. Placing the tip of your knife at the cut end at the top of the cut with the cutting side of the knife angled slightly downward, and staying 1/2" above the cutting board cut another inch into the roast while gently rolling the loin away from you with your other hand. Continue this step until you've unrolled the roast into a rectangular, flat piece. If this is your first time, take a bow, or a picture, or find somebody to high-five.

Sprinkle a little water (no more than a couple of teaspoons over the surface of the meat and cover it with plastic wrap. Using a meat mallet, pound the too-thick parts so that that you have an even thickness - ideally 1/2". Remove the plastic wrap and season with 1 teaspoon of salt and 1/2 teaspoon of pepper.

Pre-heat the oven to 350F (see the head notes regarding oven temperature and timing), rack in the middle.

Stuffing and rolling the pork loin: Keep (approximately) a 1" border around the edges of the butterflied pork loin while you are adding the stuffing. Place the kale leaves on top of the loin in an even layer. Spread the filling on top of the kale in an even layer. Roll the pork tightly along the long (cut) end of the loin -but not so tightly that everything squishes out of the middle.Wrap 1 layer of of prosciutto around the roast and tie the roast securely with kitchen twine in 1" intervals. Tuck the rosemary sprigs under the twine on the top side of the roast.

If you follow these two steps the day before, you can wrap the roast and chill in the refrigerator. Take the roast out of the refrigerator before you are ready to cook it.

Cooking the roast: Place the apples in a roasting pan. Heat a large, heavy skillet (large enough to hold the rolled, stuffed loin) on medium-high. Add 1 tablespoon of butter and the oil to the skillet. Place the loin in the skillet, adjusting the heat down if necessary. Brown the pork on all sides - about 5 minutes total. You're not looking to get any serious color here, basically, you're starting to render the fat in the prosciutto so 5 minutes is fine. Set the pork on top of the apples in the roasting pan. Add the cider and 1/2 cup water to the skillet and bring this liquid to a strong simmer, scraping up the fond on the bottom of the pan with a wooden spoon. Pour this liquid into the roasting pan and place the roasting pan into the oven.

Roast pork until the interior - tested in the center of the pork loin - reads 140F. Start checking at 1 hour. You may want to remove the apples if they're getting too squishy. For us, a 3.5 lb roast at 350F, it took 1 hour and 35 minutes to reach 140F. Your mileage may vary for a variety of reasons - oven temperature, size of your pork loin, etc. The internal temperature must be your guide.

When the roast is done, remove the pork (and the apples if you haven't already removed them) from the pan and place on a platter. Spoon off the fat from the roasting pan juices. Place the pan on top of the stove over medium high heat. Add chicken stock. Pour in the reserved mushroom juice - be sure to leave any sediment behind, and cook this liquid scraping off any fond from the bottom of the roasting pan until slightly reduced and thickened - about 5 minutes. Whisk in 2 tablespoons of cold butter in two 1 tablespoon pieces, incorporating the first before you add the second piece. Taste and season as desired with salt and pepper. Strain the sauce and slice the pork in 1/2 - 3/4 inch slices. Serve the apples and sauce along side of the pork.

Take a short victory lap and then go enjoy the dish.

No-Name Potatoes, or Potatoes Cooked Three Ways, or...
 - Serves 6

This is what you want for each potato piece: a column approximately  2  - 3 inches in diameter and 2-3 inches in height. No matter what, you're going to have some potato scraps left over. If, like me, you hate waste, simmer the leftover bits until tender and drain. Mash them with some salt, pepper and butter. Put them in the refrigerator covered and make some potato cakes for breakfast the next morning. The first time I made this, I used really big russets (and the russet potato is the one you want here) and was able to get 2 columns from each potato. The second time I made it - for the 2011 NYE dinner - I was using smaller potatoes that yielded 1 column each. Make a few more columns than you need in case a couple get shaggy when you're simmering them in the first step.


Ingredients:
  • 12 2-3" wide and 2-3" tall columns of peeled, russet potatoes. The number of pieces you prepare and serve per person depends on the size of your potato columns.
  • kosher salt
  • 1/4 cup oil with a high smoke point (canola is what we used) + more
Preparation:

While you're preparing the potato columns, bring a large pot (5-6 quart size) of water to the boil. When the water comes to a boil, add 1 tablespoon kosher salt and stir. Reduce heat until the water is at a strong simmer/low boil. Using a spoon, lower the potato columns one at a time into the water. Depending on how many you're making, you may want to do this step in two batches as crowding the pan can make the potatoes shaggy (overcooked - do not want!) as they bump up against each other in the pot.

Cook the potatoes until they are just tender, or just slightly undercooked. Test carefully by slipping a long toothpick into the top, cut side. Remove each one when it's done to a clean kitchen towel-covered baking sheet to dry, cut side up. Cook the second batch if necessary. You want the pieces to be tender and the surface of the potato smooth and not shaggy (overcooked). The potatoes should sit on the cloth-covered baking sheet until they are completely dry - at least 30 minutes and up to an hour.

Pre-heat the oven to 350F, rack in the middle.

When the potato pieces are completely dry, pre-heat 1/4 cup oil in a heavy, wide (12") skillet or dutch oven (5-6 quarts) until it shimmers and you see the beginnings of a wisp of smoke or two. Using a pair of tongs, gently place one potato piece, cut side down, in the hot oil. Continue to add potato pieces to the pan, but do not crowd them or they will steam and not fry.  Cook the pieces on one side, until they are a dark but still golden brown. Using tongs, gently turn and brown on the other cut side. When both cut sides are browned, remove kitchen towel from the baking sheet and place the pieces to the sheet.

When all of the potato pieces have been browned on the cut sides, brush them very lightly on the sides (the round part) with oil and put the baking sheet into the oven for 15 minutes. Check with a skewer - if you slightly undercooked them in the first step you can finish them off in the oven - and remove the baking sheet when they are done. Season very lightly with kosher salt on both sides and serve hot.

Salad with Grapefruit, Toasted Pecans, Avocado and a Grapefruit Vinaigrette
Serves 6


I like my vinaigrette tart so I use close to a 1:1 ratio of acid to oil, with maybe a little bit extra on the oil side. You may prefer a 1:2 (or other) ratio of acid to oil so adjust to taste.


Ingredients:
  • 1 ruby red or pink grapefruit, supremed, with 3 tablepoons of reserved juice
  • 1 tablepoon Sherry vinegar (substitute rice vinegar or Champagne vinegar)
  • 30-36 toasted pecan halves (or 5-6 per serving)
  • 1 large, ripe avocado
  • 1 teaspoon kosher salt
  • freshly ground black pepper
  • 1/4 cup extra-virgin olive oil or walnut oil
  • salad greens mix, cleaned in cold water and spun until completely dry.

Preparation:

Prepare the grapefruit by making supremes of the sections. I have a post here where I included an embedded video on this process by Michael Symon (from the CHOW site). My advice is, after you cut off the peel (reserve it because you want to squeeze the juice from any pieces with fruit), cut the supremes over a big bowl to catch the juices. Squeeze the pieces of peel with with grapefruit flesh attached into the bowl as well as the pith after you're removed the citrus segments - you want all of the juice for your vinaigrette.

Place the freshly washed and completely dried salad greens mixture in a very large bowl. It's hell properly dressing a salad in a too-small bowl.

If you are going to serve immediately after the vinaigrette is made, dice (medium) the peeled and de-seeded avocado now and set aside.

To make the vinaigrette: Pour 3 tablespoons reserved grapefruit juice and 1 tablespoon Sherry vinegar in a large bowl. Add a scant 1 teaspoon kosher salt to the bowl and 1/2 teaspoon of freshly ground black pepper. Whisk until the salt has completely dissolved. Pour a teaspoon or so of the olive (or walnut) oil into the vinegar and whisk until emulsified. Pour in another teaspoon and whisk until emulsified. Continue to add the oil slowly whisking at each addition. Taste. Add more oil if it's too tart for your taste and adjust the seasoning.

Dress and garnish the salad: add the supremed pieces of grapefruit to the bowl with the salad greens. Pour 1/2 of the grapefruit vinaigrette over the salad greens and toss thoroughly with tongs so that all of the greens are lightly covered. Taste for balance of dressing to greens. Add a little more dressing and toss then taste again. You're not making soup, you're making salad and unless your preference is on the soupy side, don't pour-in all of your vinaigrette at once.

Serve the salad on chilled plates, garnishing with the diced avocado and the toasted pecan halves.
reade more... Résuméabuiyad

Friday Dinner: Tuscan Pork Stew and Polenta

Tonight, with rain coming down in buckets, it was a perfect night for a warm, aromatic stew over creamy polenta cooked with milk and finished with some Asiago cheese and parsley. When Lynn, my cooking partner extraordinaire, suggested that we make this I was immediately all-in but since polenta's not her favorite thing, I was a little puzzled. She found a recipe on the Food and Wine site and  and thought that polenta was just the thing. It looked great to me, too - pork shoulder marinated in wine, aromatics, rosemary, sage, bay, and cloves! ... and juniper berries! According to the writer, it was developed by Chef Joe Sponzo to be made with wild boar.

...not that we don't have feral pigs with a little wild boar in the historical breeding mix here in Northern California. When I lived in Clayton for a little while (in Contra Costa County), I would read news reports of the wild/feral pigs that are the scourge of parks in and around Mt. Diablo, but no... we used pork shoulder.

One thing that struck both of us about the recipe is that it seemed like it hadn't been adapted for pork instead of wild boar. Some of the aromatics (juniper berries, cloves) and methods (boiling the meat before searing and braising it - don't do it) seemed more oriented towards game so we made some changes that I'll pass along in the recipe. In addition to the stew and polenta - we went a different direction with the polenta - we had roasted asparagus (Spring!) with garlic, salad and we drank a San Giovese with dinner.

RECIPE: TUSCAN PORK STEW WITH POLENTA

Adapted from: Tuscan Pork Stew with Polenta - Joe Sponzo | Food & Wine
Serves 6

I firmly believe that this dish is best served in a bowl. Don't include the step in the recipe where you simmer the meat before browning. This may be necessary if you're cooking wild boar, but not for pork shoulder. We reduced the spices a little (juniper berries and cloves) but let your own taste guide you. This is a hearty, delicious dish.


Tuscan Pork Stew
Pork Marinade Ingredients
  • 1 bottle dry red wine
  • 1 tablespoon rosemary leaves
  • 1 tablespoon sage leaves
  • 1 red onion, medium dice
  • 1 celery rib, medium dice
  • 1 carrot, medium dice
  • 2-3 bay leaves
  • 1 tablespoon black peppercorns
  • 10 whole juniper berries, slightly bruised with the back of a spoon
  • 1 teaspoons whole cloves
  • 3 lbs boneless pork shoulder, trimmed and cut into 2" cubes
Marinade Preparation:
Combine all of the marinade ingredients in a 1 gallon resealable bag, add the pork cubes, seal and refrigerate at least 6 hours - preferably overnight (next time we're going to marinate for 24 hours).

Stew Ingredients
  • 1/4 cup extra-virgin olive oil, divided
  • 1 celery rib, fine dice
  • 1 carrot, fine dice
  • 1 small red onion, fine dice
  • 1 large garlic clove, thinly sliced
  • 2 teaspoons sage, minced
  • 1 1/2 teaspoons rosemary, chopped fine
  • salt
  • Crushed red pepper flakes
  • 1 cup dry red wine
  • 1/4 cup tomato paste
  • 3 cups chicken stock or low sodium broth + more if necessary
  • 2 whole cloves, 8 juniper berries, 2 bay leaves and 4-10 peppercorns, tied in cheesecloth
Preparation

Preheat the oven to 325, rack in the middle.

Remove the pork from the marinade. Rinse off the vegetables and aromatics, drain and then pat the cubes very dry and set aside. Do NOT simmer them, as called for in the original recipe or the meat will become tough. Heat a large, heavy-bottom dutch oven on medium for 5 minutes. Add half the olive oil and, if you pre-heated the pan, it will be hot and shimmery in a matter of seconds. Add the celery, carrot, red onion and garlic and saute until lightly browned. Remove the vegetables from the pan and set aside. Add the last half of the olive oil and brown the pork cubes, turning them to brown at least two sides. Don't crowd the pan - you may need to brown it in batches.

When this is complete return the vegetables and pork cubes to the pan. Add the sage and rosemary. Season with salt and a pinch of the crushed red pepper flakes. Cook for one minute. Add the wine and simmer until it's nearly evaporated (about 10 minutes). Stir in the tomato paste and cook for 1 minute. Add the chicken stock and spice bundle and bring to a boil.

Cover the pan and put it in the oven and cook for 1 hour to 1 hour and 40 minutes. Check the dish after 1 hour. If it's getting a little low on the sauce, add an additional cup of chicken stock. The pork cubes should be tender and a fork should turn easily in the cubes , but not entirely fall apart. Taste one to be sure.

Creamy Polenta with Cheese and Parsley
Ingredients
  • 2 cups whole milk
  • 2 cups water
  • 1 cups polenta (not instant)
  • 1 1/2 teaspoons kosher salt + more, if necessary
  • 2 tablespoons unsalted butter
  • 1 oz pecorino romano cheese (or any aged, salty cheese) finely grated. 
  • 2 tablespoons flat-leaf parsley, chopped very fine

Preparation
 Heat the milk and water in a 3 (or more) qt. sauce pan until it just comes to barely a boil. Immediately add the salt and then the polenta in a thin stream, whisking vigorously for 1 to 3 minutes until it thickens. Turn the heat down to very low and partially cover (this is important as it becomes Vesuvius-y). Stir it occasionally (every 5 minutes) tasting occasionally until it is creamy and very nearly homogenous

Assembling the Servings
Dish some of the polenta into a bowl. Use a slotted spoon to add a serving of pork on top and then ladle some of the stew juices on top of the pork. You may want to start with a fork, but have a spoon at the ready.
reade more... Résuméabuiyad

Chile Verde

Sometimes it's hard pretending that it's summer and I should cook summer meals when I look out the window in the evening and see fog blowing up my street, my visibility is limited to two blocks and the wind is howling.  Okay I know, "Wah, wah, wah!" </end bitch session> Welcome to summer in San Francisco. At least in my neighborhood.

Last week I made chile verde and appreciated the warmth. Actually, I made it twice. The first time (a small batch with chicken) it was wimpy with absolutely zero heat. I used four jalapenos and I might as well have left them out. Coincidentally, a few days after I made it, I saw this article on CookThink. Demand for chiles has resulted in prettier, shipping friendly, but milder jalapenos.
"To meet the demand, jalapeno breeding has promoted varieties that are flawlessly pretty, easy to ship and easier to grow in cooler climates. Jalapenos used to be grown mostly in the high deserts of New Mexico, Arizona, and Northern Chihuahua and Sonora, Mexico. Hot, dry climates promote the production of capsaicin, the chemical that makes a hot pepper hot. Now, some varieties can be grown in wetter, cooler climates that don’t create enough heat for a spicy chile pepper."
Furthermore, the author provides information on varieties to look for if you want hotter or milder chiles. When I'm cooking and using chiles, I'll taste each one to get a sense of its heat - I should have followed my own advice on my first batch. Chiles are hotter at the stem end than the tip so I usually go for the middle. The ribs, core and seeds of the chile is where the majority of the heat is so if you taste the flesh and it's kinda wimpy, just trim off the stem and use the rest of the chile.

When I cook with chiles, my goal is to find the balance between enough heat without losing the taste of the other ingredients and the dish, overall.

Online Chile Resources:
Cook's Thesaurus: Fresh Chiles and Dried Chiles
Wikipedia: Scoville Scale (common method for categorizing a chile's heat)

I'm declaring my love for tomatillos. There, I said it.
Tomatillos (unrelated to tomatoes) are a fruit, related to the Cape Gooseberry. Green tomatillos are more tart than the purple-ish varieties. Raw, the taste of a green tomatillo is reminiscent of a Granny Smith apple. Tomatillos can be used raw or cooked. To prepare, remove the paper husks and rinse them in warm water to remove (most of) the sticky stuff which can be somewhat bitter. You don't have to completely remove it, so don't fret if there still some on the surface of the tomatillo.


Out of the broiler.


Sauce ingredients ready for the blender.


After blending.

Recipe: Chile Verde

Serves 6-8
Serve over rice, or with small corn tortillas, toasted just until they have a few brown spots, but are still pliable. Feel free to adjust the type and amount of chiles to your taste. This can also be made with chicken - I would recommend using chicken thighs as they stand up to long cooking without getting dry.

SAUCE
 Ingredients
  • 1.5 lbs tomatillos, husks removed, rinsed in warm water to wash off some of the sticky stuff and then set on a kitchen towel to dry

  • 4 cloves of garlic, unpeeled, but remove any extraneous papery husk - you don't want it to burn up.

  • 4-8 serrano chiles (I used 4), cored and seeded (if preferred)

  • 4 poblano chiles

  • 1/2 cup (packed) cilantro (leaves and stems)

  • 2 tablespoons lime juice

  • salt

Sauce Preparation
  • Turn on your oven's broiler.  Line a rimmed sheet pan with foil. Cut the tomatillos in half horizontally at their equators, set cut side down on a foil-lined pan.Add the garlic and serrano chiles to the pan.

  • Broil for 4-7 minutes. I have no control over how far away the broiler pan is from the element in my stove and I think it's about 4-5 inches, so check your tomatillos after a few minutes and then frequently thereafter. You want them to break down and be (quite) brown on top, but it's okay if not every single tomatillo half is uniformly browned. Have I ever mentioned that I hate broilers that are underneath the oven? Ugh. I certainly do.

  • When it's done, remove and allow it to cool a little before you remove the garlic gloves from the paper (discard this) and add everything to a blender. Do NOT add hot liquids to a blender and even if it's warm, only fill the blender halfway and hold a kitchen towel firmly over the lid. Failure to do so may result in a Vesuvius-like explosion and very painful burns. Blending in batches is just fine.

  • You also need to roast the poblano chiles. I halved mine, removed the stem, seeds and core and broiled these in my toaster oven. Although I have a gas stove it's quicker to do it this way unless I am roasting them whole to be stuffed. You want the skin to be completely blackened. Remove from the broiler and let them cool down a little before removing the skin. I can usually just pick it off with my fingers, but you may also use a dinner knife and scrape gently. Do not rinse them!

  • After you've removed the skin, add poblanos, the cilantro and the 2 tablespoons of lime juice to the tomatillo mixture and pulse a few times. Blend until everything has broken down and the mixture is homogenous. Season with a pinch of salt and pulse a couple of time, then taste and adjust as necessary. You don't want this to be seasoned as 'ready to eat' because there are other ingredients as well as chicken stock or broth to consider, so be conservative. Set aside while you're preparing the remainder of the dish. This can be made a couple of days in advance and stored covered, in the refrigerator.


CHILE VERDE

  • 3-4 lbs boneless pork shoulder, trimmed of exterior fat, some of the interior fat and as much as you can of the connective tissue that won't melt in the cooking process. Cut into 3" x 2" (approximate) chunks. Don't go crazy and remove ALL the fat - it is a natural meat-baster. It's hard to remove fat after the dish is fully complete if you prefer less fat, because the sauce is very thick, but not too hard after the first phase where it has been cooking in the sauce for just about an hour

    Season the pork pieces on both sides with about 3/4 teaspoon of kosher salt for every pound of meat. Store in the refrigerator for several hours and, if you have the time, up to three days.

  • 2 tablespoons oil - high smoke point (I used canola)

  •  2 medium onions, large dice

  • 4 cloves garlic, minced

  • 2 serrano chiles, small dice

  • Tomatillo sauce (see above)

  • 2 cups hot chicken stock, or low sodium chicken broth, or water +more if necessary

  • 4 tablespoons fresh ground cumin powder, divided

  • 4 tablespoons fresh ground coriander powder, divided

  • 2 tablespoons Mexican oregano, divided

  • 1/2 cup (packed) rough-chopped cilantro leaves (I use the stems too, but you might just want the leaves)

  • Sliced, pickled jalapenos - homemade or from the store. You can buy them hot, medium or mild. I used 1/2 a jar (including the juice), labelled "hot".

  • kosher salt and freshly ground pepper

Suggested Garnish:
  • Avocado, sliced or diced, quartered limes or lime slices, cilantro leaves roughly chopped.

Preparation:
Remove the pork pieces from the refrigerator 20-30 minutes before you're ready to cook it. Add the oil to a large, heavy dutch oven and heat on medium high until the oil shimmers. Test with a piece of the pork - it needs to seriously sizzle. Add the pork shoulder pieces and brown well on each side - three to four minutes. You don't want to crowd the pan, so do this in batches if necessary. Remove to a platter and pour out all but a couple of tablespoons of remaining fat.

Add the onions and cook until translucent and just slightly golden, adjusting the heat if necessary so that you don't brown them too much. Make a little room in the pan and add the minced garlic and diced serrano chiles. Cook until the garlic is a very pale straw color. Add 2 tablespoons of the cumin, 2 tablespoons of the coriander and 1 tablespoon of the Mexican oregano and combine with the other ingredients already in the pan and cook on medium for 3-4 minutes.

Add the tomatillo sauce and stir it to combine with the other ingredients. Cook this at a strong simmer for about 5 minutes, uncovered. Add 2 cups of the chicken stock or low sodium broth and stir to combine. Cook this for another 5 minutes and taste. Adjust the seasoning if necessary.

Add the pork back to the pan along with any accumulated juices and cook everything, covered, at a medium simmer for about an hour. At this point, if you wish, you can skim off any fat that has risen to the top of the mixture.

Remove the cover and continue to cook at a medium simmer for about 30 minutes. Add the remaining 2 tablespoons cumin, 2 tablespoons coriander and 1 tablespoon Mexican oregano. The chile will start to reduce in volume. Add the cilantro and the pickled jalapeno slices and continue to cook until it has reached the consistency of a thick stew. Take the chile off heat and roughly break up the pork pieces with two forks - they should be chunky, but easy to eat. If you're going to serve this with tortillas, you don't want it to be too liquid-y. Taste and adjust the seasoning.

Serve over rice, with tortillas (or both) and serve garnishes on the side.
reade more... Résuméabuiyad

Friday Dinner: Barbecued Country-Style Boneless Pork Ribs + Al Bergez's Sauce

I wrapped-up some of the warmed-up leftovers and sauce in a slightly crisped 4" corn tortilla for lunch.

(Another catch-up post) Back in early May, I was (as I am quite frequently) at my best friend and cooking partner-in-crime's (a/k/a Lynn) house for dinner. We barbecued country-style boneless pork ribs. No biggie, except... EXCEPT... we were done before dark - which is a giant improvement and the ribs were especially good. Her method for prepping the pork resulted in very, very good barbecue.

I acquired one of these for each of us earlier this year. Many a night we have barbecued well after dark, with one of us holding a flashlight. The ones I bought were through woot.com, but you can get your own here. They are fantastic. The light can be adjusted so that (in our case) what you're cooking, or checking on is brightly lit and you have both hands free.

...and no, there shall be no pictures.

One note - it's a really bright light and you need to be careful not to temporarily blind your cooking partner by looking up too quickly.

She made, not for the first time, a very good sauce, by way of Mike's friend Al Bergez. It's on the vinegar-y/tangy side (which we all like). I'm pretty happy with any kind of sauce or mop, except the mayonnaise-based sauces which I find to be kinda nasty. This sauce isn't hot (but it could be made hotter) or too sweet.

We had a problem keeping a consistent temperature - definitely user error. Sometimes our barbecue temperature control mojo is very strong - but not that night. Our overall karma came through like gangbusters though because when we were going to take the pork off to finish it in the oven, we found that it was done perfectly. This recipe/method requires some time before you fire up the coals (or turn on the gas) and I'm convinced it that the pork was even better than usual because of the order in which Lynn prepared it prior to grilling it.

Recipe: Barbecued Country Style Boneless Pork Ribs + Al Bergez's Sauce

I'm guessing this could serve 6-8 people
 - wood charcoal (mesquite, alder, hickory)
 - we used a 28" diameter Weber kettle grill
 - a barbecue thermometer to monitor the temperature of the barbecue 'oven'.
  • 6 lbs boneless country-style pork ribs, trimmed and cut into 3"x2"x6" chunks
  • 1/2 cup brown sugar, lightly packed
  • 1-2 tablespoons of kosher salt
Mix the brown sugar and the kosher salt. Lay the pork ribs out on a baking sheet or platter and rub each on all sides, as well as the nooks-and-crannies with the sugar/salt mixture. Let these sit for an hour before applying the following:

Mix together (it will be a rather dry paste):
  • 4 very large cloves (or 6 regular cloves) of garlic, mashed into a paste
  • 1 tablespoon kosher salt
  • 1 tablespoon ground black pepper
  • 1 teaspoon dry mustard
  • 2 tablespoons of sweet paprika
  • 1 1/2 to 2 tablespoons of ground cumin
Slather this paste all over the ribs and let them sit covered, in the fridge for at least four hours and up to 8. Take the ribs out no less then an hour before you plan to start cooking them, leaving them covered while they come up to temp.

This two-step method is (I'm pretty sure) what made this extra-good. When you take a bite, you get a slightly sweet, caramelized taste and then the flavors from the paste come through separately - and porky goodness abounds.

Prepare the Barbecue
You want enough coals or wood charcoal - we used mesquite - to cover about 1/2 the grill + a few big chunks.  Make sure you have more to add on if your temperature drops. When the wood is ashy on the outside but you can see glowing red under the ash, spread the coals over one-half of the bottom of the grill. We didn't do this last Friday, but we have done so in the past - pour 1/2 bottle of beer (a good beer mind you, like Anchor Steam) in a foil tray and set on the bottom of the grill, opposite the coals. You made need to replenish this 1/2 way through (I don't have to tell you do drink the other half, do I? No? Good.)

This is a good time to espouse the benefits of a barbecue thermometer to keep track of the heat of your 'oven'. You want to cook this meat between 250 and 325 F (the lower the temp, the longer your cook time) but we were looking for about a 3-hour cook time. You can buy inexpensive barbecue thermometers pretty easily.

Clean off the grill and lightly brush it with a little canola oil on a paper towel (Do I need to remind you to hold this oil-soaked paper towel with a pair of tongs? No? Good.). Lay the pork ribs on the side of the grill opposite the heat and over the pan o'beer. Cover the grill, positioning the holes (open) over the side with meat to draw the heat over it. Open the bottom vent about 3/4 of the way.

Your starting temperature should be between 275 and 300 F. Monitor this and adjust your vents or add some more fuel if necessary. When the meat is done, it shouldn't be fall-apart tender, but when you stick a fork in it and wiggle it around, you don't meet too much resistance.

It's probably a fine time to make the sauce, if you haven't already done so (see below).

now's the time to throw the ears of corn on the hot side and get some nice brown color all around. Not too long - you are grilling for color and to just barely cook the corn.

I like my sauce served on the side but your house/your rules so do what you want.


Al Bergez's Vinegar-y Barbecue Sauce
  • 2 tablespoons sugar
  • 2 teaspoons ground black pepper
  • 2 teaspoons dry mustard
  • 2 cloves garlic minced finely
  • 1 1/2 cups apple cider vinegar
  • 2 tablespoon olive oil
  • 2 teaspoons of A-1 Sauce
  • 1/4 cup Worcestershire Sauce
  • 2/3 cup tomato ketchup
Simmer for 20 minutes.
reade more... Résuméabuiyad

Friday Dinner: Crispy Taco Shell U - starring Carnitas SUPER STAR!

This is a salute to my non-bio sister Lynn's Mexican food that I've been eating happily for years. It's always delicious and I've learned a great deal from her as well. We won't be talking about the chile verde in this post... but we'll get to that on a later date.

Last Friday as we were cooking, I told her that years ago the first time I saw her making crispy taco shells I was blown away: in a room full of people, she was holding down a conversation, grooving to music, drinking a glass of wine and smoking (she no longer smokes) all the while turning out beautifully formed U-shaped shells while seemingly paying no attention to the process.

We talked about that, and she told me that a couple of decades-ish ago a house mate's chef girlfriend taught her to fry tortillas with two forks and she never looked back.

What We Ate
Ha! I had to hide the beans and rice with a
Chimichanga because I'd
already shoved a bunch in my face
Last Friday we ate crispy tacos, NFNG rellenos (see: below), Chimichangas (Mike's favorite), rice and beans and salsa. Sadly, our avocado was sub-standard and we had no guacamole (I KNOW - so sad!). I gave one of the leftover rellenos to my housemate who, when she had eaten one for dinner a couple of nights later, texted me, "That was an AMAZING relleno!!!!" Yeah, they were that good and my housemate knows her stuff.  The starring roll in this was pork carnitas. I was in charge of the first half of the carnitas, and Lynn took over the shredding, final seasoning and making them crispy - the recipe/method we used is after the jump.

Crispy Taco Shell U
Lynn cooked up the first one with commentary while I observed and I was responsible for the rest - a taco shell refresher course (I had already passed the entry level class a year or so ago but I don't do this very often).  She is a very good teacher. Oh - if you're using tongs with channels make sure the business end remains below the the level of the hinge end so that hot oil never cascades out of the hinge end onto your hand. On my eighth shell, I learned that lesson the hard way. The two little spots of burned skin on my palm say, "Holla!" to that.

Swish and Flick - Okay, Don't Flick, Just Swish and How to Avoid the V

Lynn's about to slug me after I made her move
around the kitchen about a million times
to find decent light to photograph a black pan.
Someday I'm going to film it because I'm pretty sure my description won't do it justice, but the basics are an inch of oil (something neutral with a high smoke point - we used canola) in a pan, a pair of tongs, newspaper or a deconstructed paper bag to drain them on, and a stack of corn tortillas. Having a pan - the one in the picture is a mini-paella pan - with rounded sides helps but isn't a requirement.The oil should be at/around 365F. If your heat's too low, they'll be leathery and not crisp and bubbly. The other big secrets are to keep them moving, keep the part you are cooking submerged, keep the open end open, learn to recognize (by sound) when the oil has stopped bubbling and finally, try to keep the open end facing you.

Slide the tortilla in the oil and swish it around (gently). Pick up one end with tongs so that about 60% is out of the oil and is at (about) a 90% angle. Swish back and forth gently for a seconds until the 40% in the oil kind of holds its shape.
Switch your tongs to the other side and do the same.  It's all abut the U shape.  If the open end starts to close - and, like a clam, it WANTS to close - keep the open end open with your tongs. Once it has a U shape, swish it (slowly and gently on all sides, keeping the part you're frying submerged.  When it is bubbly, and a pale golden brown, remove it and set it on the aforementioned newspaper or flattened paper shopping bag open end down to drain.

Oh - if you end up with a V shape on a couple, as long as the top is open, it's not a bad day. We reused the oil for the Chimichangas which are not deep fried but pan fried. (Mmm... fried!)

The Truth About Roasting Chiles and NFNG Rellenos

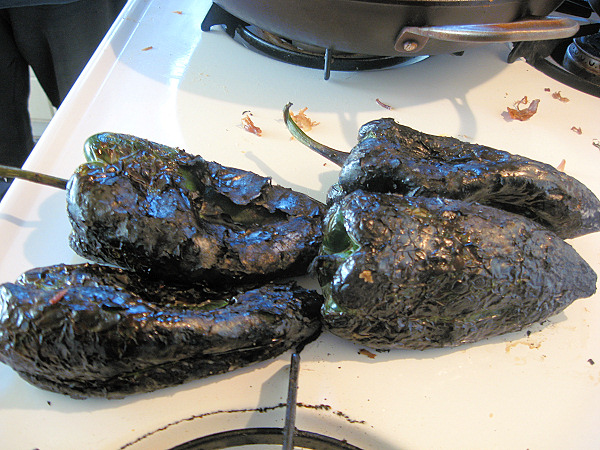
Lynn is also the the one who suggested the "No Fry, No Guilt Relleno". Don't get me wrong, fried things are a wonder but the NFNG Relleno has all the benefits and none of the guilt and you don't have buckets of oil to deal with afterwards. She taught me how to roast chiles.  If you have a gas range, you don't need to do them in the oven, broiler or put them in paper bags to steam.  Just roast those babies over the fire until the skin is completely - I mean completely - black and let them sit a few minutes.  Pick them up at the wide end and scrape them with a dinner knife until all of the skin comes off easy as pie. Oh - do not rinse them.  Do. Not. What? Do you want to rinse off all of that beautiful smoky flavor? Just make sure you scrape off all of the burned skin, take out as many of the seeds as you can manage, and you will have a delicious roasted chile

Do Not Wear Poblano Chiles as Gloves
A couple of years ago, I had the bright (read: stupid) idea to drape the poblanos over my fingers while I was scraping off the skins. Poblanos are generally mild, like any chile, there can be a range of heat.  In this case, they had more than a little heat and by the time we sat down to eat, the top side of the first three fingers of my right hand looked like a cooked lobster and felt like I was holding them over a lit match. Multiple applications of aloe and the miraculous but sadly discontinued Johnson & Johnson First Aid Cream helped but to this day the tops of those three fingers are still very heat sensitive.  Oh - now I leave the tops on and make a long slit in one side of the chile and take out the seeds - much better for stuffing.

We stuffed the poblanos with a mixture (I just eyeballed the amounts) of pork, rice and cheese and I topped them with some salsa and more cheese.  We cooked them just to warm them up and melt the cheese - 350F for about 25 minutes, +/- a few.
Ingredients for the braise.


RECIPE: CARNITAS SUPER STAR!
Ingredients
  • 3-4 lb boneless pork shoulder
  • 1 tablespoon salt
  • 1 tablespoon ground black pepper
  • 1 tablespoon Mexican oregano (regular if that's not available)
  • 1 tablespoon of ground, toasted cumin seeds
  • 4  garlic cloves - mashed + 2 tablespoons olive oil (combined into a paste)
  • 2 cups of chicken stock (or water's fine)
  • 1 medium onion, large dice (I had just 1/2 a red onion so that's what I used)
  • 2 bay leaves
  • 2 limes (I used lemon because that's what I had)
  • 1 orange
  • 2 tablespoons reserved pork fat, or 2 tablespoons oil with a high smoke point 
  • 1 small onion, small dice
  • 3 small to medium garlic cloves, minced
  • 2 teaspoons toasted, ground cumin
  • salt/pepper (season to taste)
 Method
Preheat the oven to 300F / Rack on the lowest  level or 2nd from the bottom - I used a 7 qt dutch oven so I put one rack on the bottom and the dutch oven on the 2nd rack to make sure I had enough space.

  1. Trim the fat cap (if it exists) from the pork shoulder. Cut it into 2" x 3" (ish) inch pieces and trim any big fat globs on the outside.  There is a lot of connective tissue and interior fat - don't mess with that too much.  The connective tissue will melt, as will most of the fat (and then be skimmed off) but even after it has cooked, you want a little left.
  2. Combine the salt, pepper, Mexican oregano and ground, toasted cumin seed in a small bowl. Season each piece on all sides and rub it in.  Slather the pork chunks with the mashed garlic/olive oil mixture. I let my pork sit on the counter for an hour - you could put in the refrigerator for a few hours if you wish.
  3. In a large, heavy dutch oven, nestle the pork chunks in the bottom. Add the onions, bay leaves, chicken stock and both the juice and spent halves of one of the limes and the orange.  Pull the pork chunks around to allow the other ingredients to get in-between the chunks.  
  4. Bring to a simmer on top of the stove and then place the covered dutch oven on the rack and let it cook for at least two hours at 300F.
  5. After two hours, pull the dutch oven out and test the pork chunks.  You don't want the meat to be completely broken down. Stick a dinner fork in one of the chunks and slowly turn it. The meat fibers should easily turn and break apart when it is done. Pick a little piece off and taste it - there's no better way to make sure the texture is right. If it's not done, stick the covered dutch oven back in the oven for a 30-60 minutes, checking it at 30 minutes.
  6. When it is done, take the dutch oven out and leave it on the stove top to cool a little. Remove the pork chunks with a slotted spoon or spider and place them in covered bowl - they can go into the refrigerator. Strain the solids out of the liquid and skim to remove as much of the fat as possible.  Reserve the pork fat - don't throw it away. Depending on how closely you trimmed your pork shoulder, you may need it. I had about a quarter cup and refrigerated it in a small, covered bowl.
  7. Add the strained, de-fatted liquid to a clean sauce pan and reduce until you have the consistency of a glaze. Store the glaze in a covered container.  I had about 1 cup of glaze.
It's crispy time!! When you're ready to use the carnitas... 
  1.  If the cooked pork has been in the refrigerator, remove it and let it come up in temperature a little so it's easier to handle.
  2. Remove a few of the pork chunks to a board and shred them with two forks. II don't shred them completely - I leave a few little chunks. If there are still big fat globs, you can remove them at this time - just don't take it all. Return the shredded pork to the bowl in which it was stored and continue to shred.
  3. You will need to do this in batches. Add 1 tablespoon of the reserved pork fat or oil to a very large skillet (12") .Heat on medium high until the oil shimmers. Add the diced onion ;and season with a pinch of black pepper. Turn the heat to medium and saute until they are translucent. Add the garlic and saute for about a minute. Add the ground cumin and saute for another minute. Remove this mixture to a bowl and wipe out the skillet.
  4. Turn the heat up to high. Add a little (1 teaspoon) of pork fat or oil to the pan and when the fat shimmers, add your first batch of shredded pork. Fill, but don't stuff the pan.  Let it sizzle and turn it down a little if necessary. Check the underside of the shredded pork. It shouldn't be uniformly brown (like hash browns) but about 1/2 the pork on the cooking surface should be browned and crispy. You're looking for a combination of tender shredded pork with some crispy bits. Toss or turn the content over with a large spatula and brown for few minutes more. I turn out each batch on a stack of newspaper but if you're a more delicate flower, you can use a giant stack of paper towels on top of a platter or baking sheet.
  5. Keep crisping up the pork in batches.  Turn down the heat to low, add back the onions, garlic and cumin when you've cooked the last batch and then add back the previously crisped shredded pork.  Pour the glaze from the reserved braising liquid over everything and use tongs to gently toss and combine all of the ingredients.  You can leave this on low to warm or put in the oven on a very low heat to keep it warm.
In the crisping section you can add all sorts of things as desired - diced, roasted hot chiles, chopped tomato - whatever you wish.
reade more... Résuméabuiyad

Baked beet and black beans with pork

Baked beet and black beans with pork is slow food made in the old-fashioned way. A ceramic bean pot or dutch oven is required for slow baking in a hot oven. The combination of flavours creates a subtle undertone of sweetness that urges your diners to ask for second helpings. Mmmm-mmmm, it will be delicious with your smoked Easter ham.

Baked beet and black beans with pork

Baked beet and black beans with pork is a meal in itself, full of the health benefits of beets and beans, including an abundance of protein, dietary fibre, calcium, and other minerals.

Set oven to 460℉  (240℃)
Cooking time: approximately 4 hours
                                                    
                                                            Yield: 8 - 10 servings

Ingredients:

1 cup dried black beans
2-3 cups water for soaking

6 dried shiitakes
1 cup water for soaking

1 medium beet root, 5 cm. (2.5 in.) in diameter
1 cup diced red onion
2 minced garlic cloves
1 cup lean ground pork
1½ cup diced tomatoes in tomato juice
1 tablespoon old-fashioned prepared mustard
2 tablespoons raw molasses
2 tablespoons apple cider vinegar
pinch of ground cinnamon
pinch of ground cloves
3-4 grinds of black pepper corns

Dried black beans

Pre-preparation:
1. Wash black beans.  Drain and discard the water. Place beans in a lidded container. Cover beans with 2 - 3 cups water. Cover with lid and leave to soak overnight. 

2. Place shiitakes in a lidded container. Cover with warm water and leave to soak overnight. 

Clockwise: shiitake, diced tomatoes in tomato juice
soaked black beans, and red onion
Preparation:

3. When assembling ingredients, drain the shiitake liquid into a separate container and reserve for later use in cooking. Slice the stems off the shiitakes and store them in the freezer for another time when making stock. Thinly slice the shiitake. place them into the bean pot.

4. Slice and dice red onion, and mince the garlic cloves. Add to the bean pot.

5. Drain water from soaking black beans into a separate container and reserve for later use in cooking. Add beans to the bean pot.

Grated raw beet


6. Wash, thinly peel, and coarsely grate the beet.  Add to bean pot.

7. Measure lean ground pork. Loosen the mince and mix the pork into the ingredients in the bean pot.

8. Add tomatoes, mustard, molasses, apple cider vinegar, pepper, cinnamon and cloves. Mix into ingredients in the bean pot.

9. Add strained liquid reserved from soaking shiitake. If ingredients are not covered with liquid, add strained liquid reserved from soaking black beans but only sufficient to just cover the ingredients.

10. Place in oven at 460℉ ( 240℃) for 20 minutes. Reduce temperature to 425℉  (220℃) and bake for 3 - 4 hours. 

Test the beans for done-ness after 60 minutes. To test, remove one bean from the pot and squish it with an ordinary table fork. If completely soft, the beans are cooked as is everything else in the bean pot, so remove the pot from the oven. Most likely, the baked beet and beans will require at least another hour or two of baking at 425℉. This depends upon a number of factors, including the elevation above sea level where you live; even more than 4 hours of baking time could be required. In any case, bake covered until the beans are soft. Keep the contents covered with liquid by adding strained liquid from soaking the black beans, or use plain hot water.
reade more... Résuméabuiyad