Pages

.

Swedish baked beets

Swedish baked beets are traditionally eaten with salted fish. They are also delicious served with beef, lamb, bison, or wild fowl. Eat this dish however you choose: hot out of the oven, at room temperature, or cold as an alfresco summer picnic dish.


Swedish baked beets


                                                                               Yield: 4-6 servings

Oven: 240℃  (460℉)

Ingredients:

3 medium-sized beets
1 large red onion
2 tablespoons extra virgin olive oil
sea salt
fresh ground black pepper
½ - ¾ cup commercial soured cream
Garnish: 5 -6 sprigs fresh dill


Preparation:

1. Wash beets. Remove beet leaves, leaving about 2.5 cm. (1 in.) of stem attached to the roots.

2. Using 1 tablespoon of olive oil, coat beet roots in oil. Place whole beet roots in an aluminium foil cooking wrap, add a dash of salt and pepper, and close the foil wrap securely. Place the foil wrapped beet roots in a heat-proof baking tray. Bake at 240℃   for approximately 1.5 hours. 

Cooking time required will vary with the beet's size, origin and type, and with your elevation above sea level. Wearing heat-proof oven mitts, test the roots for doneness by gently pressing the them with your fingers.If the root gives way slightly, baking is complete.

3. Peel red onion and slice into 8 to 16 wedges, depending upon the size of the onion. Place onion wedges on a baking tray. Drizzle with the other tablespoon of olive oil. Add salt and pepper, if preferred. Bake at the same time as the beets. The onion wedges should require approximately 20 - 30 minutes if placed below the beet roots. Less time will be required if the wedges are placed high in the oven. 

When the onion wedges are just slightly singed on some tips, remove from the oven, loosely cover, and set aside.


Roasted red onion wedges

4. When the beet roots are baked, remove them from the oven. Slip the peels off. Quarter the beets into wedges and, possibly, divide the wedges again into bite-sized wedges, depending upon the size of the beets.


Baked beets, fresh from the oven


5. Arrange baked beet and red onion wedges in a serving dish or on a serving plate. Either add dollops of sour cream over the vegetables, or place the sour cream in a separate serving dish. Garnish with fresh dill. 

reade more... Résuméabuiyad

Kumquat: The Inside-Out Citrus (...that's not necessarily citrus)

References to kumquats (gam gwat - golden orange) can be found in Chinese literature in the 12th century.  Kumquats preserved in salt and stirred into hot water are a Cantonese remedy for a sore throat.

They are neither an orange nor are they consistently identified as citrus. They are classified in the genus Fortunella, named for Robert Fortune, the Scottish botanist. Fortunel brought the 'nagami' (oval kumquat) to the West in the mid-1800's and it remains the type. Other types are: the meiwa, the marumi and the Hong Kong kumquat. (From: Saveur)

I'd seen them around over the years, but I had NO clue what to do with them and if I'm to be honest, I'll tell you that I wondered why the hell you'd go to the necessary trouble to peel something so small (Oh! Ignorant! DivinaLoca!).

I buy my avocados at the Brokaw Farms stand at the Ferry Plaza farmer's market. They mostly grow avocados but they grow and sell other fruit, notably delicious Gold Nugget mandarins, blood oranges, cherimoya (these are amazing- and another "Who knew?" moment after I  popped my cherimoya this winter) guavas and meiwa kumquats. Will's are the only kumquats I've knowingly eaten, but I've read that the meiwas are sweeter than other varieties.

One morning I bought a handful. When I got them home I cut one open, surprised at the tiny amount of pulp compared to the peel, and seeds - there were two or three seeds per kumquat. In the spirit of "What the hell", I popped one in my mouth.

SourSweetAromatic~Wow!~ButTheSweetIsComingFromThePeel~WOW! Seeds were no bother, I just crunched right through them. I buy them every week now when they're available but like strawberries, I never seem to get around to doing anything with them, I just eat them.  Last night, Liz (of Today's Special) posted that she, "...sliced [them] in a salad with toasted walnuts and shaved Piave cheese..." I might actually stop the hand-to-mouth repetition for that.

Other recipes I'm looking at are:


What about:
  • Salsa - with kumquats, red onions, cilantro, and maybe a little chipotle in adobo?
  • Vodka-Kumquat infusion? Kumqua'cello?
  • Lamb stew with kumquats and olives?
  • A warm salad of lightly sauteed chard with kumquats and shallots?

Although it has already passed (it is held in late January), Florida has a kumquat festival or you can watch a cute-bordering-on-annoying video on how to eat a kumquat on YouTube, or you can just trust me and when you see them, buy a few and just pop one in your mouth.
reade more... Résuméabuiyad

Moroccan chard with lamb

Fresh lamb is readily available in the shops during this spring season. Many prefer lamb to ham for Easter meals. 

If you liked the Moroccan chard recipe, you'll love this dish. It comes to you courtesy of a Moroccan colleague who liked my Moroccan chard recipe. He strongly recommended using vegetable oil because of the high temperature required for searing the lamb. I, however, do not use vegetable oil. I noted his instructions but adapted the ingredients to my own taste. I used coconut oil in this, my own version of the dish he described.

Moroccan chard with lamb, steaming hot and fresh from the pan

                                                                              Yield: 4 servings

Ingredients:

4 lamb chops
2 large red-stalked chard leaves, washed
2 large white-stalked chard leaves, washed
1½ cups red onion, diced small
1 tablespoon extra virgin olive oil
¼ teaspoon fresh ground black pepper
¼ teaspoon ground cumin
¼ teaspoon ground paprika
¼ teaspoon ground red (cayenne) pepper
1 tablespoon coconut oil
fresh ground sea salt
4 tablespoons fresh lemon juice


Preparation:

1. Slice the stalks away from the washed chard leaves. Slice the stalks, crosswise, into 5 mm. (¼ in.) slices. Set aside.

Chopped chard
2. Slice the chard leaves crosswise, to produce strips about 1 cm. (less than ½ in.) wide. Then roughly chop these strips crosswise. Set aside.


3. Slice away and discard the fat from four lamb shops. Pare the meat from the bones. Slice the meat into bite-sized pieces. 

4. In a saute pan, heat the olive oil and add the diced red onion. Saute over low heat for about 3 minutes until the onion becomes translucent. Add the sliced chard stalks, cayenne, black pepper, cumin and paprika.  Cook over medium heat for 3 - 4 minutes. 

Sauteed red onion and chard stalks

5. Remove contents of the saute pan to a heat-proof holding dish.

6. Return the saute pan to the heat. Add the coconut oil and raise the heat to high. Add the chopped lamb and the bones to the sizzling hot coconut oil. Sear the chunks of lamb on all sides to seal in the juices, then reduce the heat to medium and fry for up to 5 minutes, until the inside is still slightly pink. 

Seared lamb

7. Add the contents of the heat-proof dish to the saute pan and heat through.

8. Add the sliced chard leaves and cook without stirring until leaves are wilted. Add sea salt to taste.

Chard slices wilting over seared lamb, chard stalks
and red onion


9. Remove from the heat and turn out into a serving bowl. Sprinkle with lemon juice.
reade more... Résuméabuiyad

Beet greens smoothies

Beet greens, beet leaves, beet tops: call them what you will but whatever you call them, know that they are nourishing food. And when eaten as raw cuisine, they deliver the maximum essential nutrients.

These beet green smoothies are made with the minimum of fuss. They are perfect for our busy modern lifestyles. They taste delicious and, what's more, they provide hefty portions of the recommended daily intake of fruits and vegetables.

So don't throw those beet greens away. Drink them instead.


Beet greens, star fruit and cucumber smoothie


Beet greens and dragon fruit smoothie


Beet greens smoothie


Beet greens and celeriac greens smoothie


reade more... Résuméabuiyad

How to Make a Roasted Beet Salad ♥ Recipe

Roasted Beet Salad
Today's beet salad recipe: Just roasted beets with a little cheese (feta or goat or blue) but somehow, so much more. So rich and full of satisfaction, just one (Old Points) or two (PointsPlus) Weight Watchers points.

Never met a beet salad I didn't love, nope, nary not a one. If there's a beet salad on the menu, odds are high (as in 99.9%) that I'll be chomping at the beet bit. I recall one memorable beet salad at the Snake River Grill in Jackson, Wyoming three years ago, another at Brasserie here in St. Louis just last week and dozens in between. I love how chefs vary a simple roasted beet salad, some times dressing up the beets, but often just letting them stand alone almost-black and all aglisten.

But it was our friend Maxine Stone – the Maxine I call her now, she of Missouri's Wild Mushrooms, the guidebook to foraging for mushrooms commissioned by the Missouri Department of Conservation plus the Hot 'n' Sour Chickpeas everyone's loving – who's had me lusting for one beet salad after another. At dinner one relaxed and unseasonably warm April Friday evening, she laid out a simple supper, mushroom and butternut squash ravioli (St. Louisans, watch for these in the freezer at Viviano's On the Hill, they were fabulous) sauteed with tiny bites of morels and asparagus; roasted beets with goat cheese; and a simple salad and good bread. Among friends, what a feast!

My version starts with roasted beets served at room temperature for the most flavor, with a few chunks of good feta – which, at room temperature, also turns as creamy as goat cheese, but with fewer calories. A good stinky blue cheese? Yes, that would be dreamy too. I use just a teaspoon of olive oil to make the beet cubes slickery, a touch of lemon juice to brighten it all, a quick chop-chop of fresh dill (or chive or basil or tarragon or ...) for contrast, a sprinkle of salt and a dash of pepper. That's it. Sublime.
Keep Reading ->>>
reade more... Résuméabuiyad

Moroccan chard

All the nutritional benefits of Swiss chard are captured in this lightly sautéed, flavourful dish. The recipe produces enough for one person, therefore, you should increase the quantities in accordance with the number of adults who will be eating.

Moroccan chard

                                                                                   Yield: 1 serving

Sliced chard stems and leaves,
paprika, cayenne, cumin
and lemon
Ingredients:

2 large chard leaves with stalks, washed
1 small cloves of garlic, minced
1 teaspoon extra virgin olive oil
¼ cup vegetable or poultry stock
 large pinch of fresh ground black pepper
 large pinch of ground cumin
 large pinch of ground paprika
 large pinch of ground red (cayenne) pepper
1 tablespoon fresh lemon juice


Preparation:

1.  Slice the stems away from the washed chard leaves. Slice the stems crosswise, into 1 cm. (smaller than ½ in.) slices.

2. Slice the leaves crosswise, to produce strips about 1 cm. (less than ½ in.) wide.

2.  In a saute pan, heat the olive oil and add the minced garlic. Stir and cook until the garlic releases its fragrance. 

3. Add the sliced chard stems and vegetable or chicken stock. Reduce heat to simmer. Cook for 3 minutes..

4. Add spices. Stir and cook for 1 minute.

5. Add sliced leaves. Stir until leaves are wilted. Cover and simmer for 1 minute. Remove the cover and continue cooking for 2 minutes. 

6. Remove from heat and turn out into a small bowl. Sprinkle with lemon juice.
reade more... Résuméabuiyad

Friday Dinner: Crispy Taco Shell U - starring Carnitas SUPER STAR!

This is a salute to my non-bio sister Lynn's Mexican food that I've been eating happily for years. It's always delicious and I've learned a great deal from her as well. We won't be talking about the chile verde in this post... but we'll get to that on a later date.

Last Friday as we were cooking, I told her that years ago the first time I saw her making crispy taco shells I was blown away: in a room full of people, she was holding down a conversation, grooving to music, drinking a glass of wine and smoking (she no longer smokes) all the while turning out beautifully formed U-shaped shells while seemingly paying no attention to the process.

We talked about that, and she told me that a couple of decades-ish ago a house mate's chef girlfriend taught her to fry tortillas with two forks and she never looked back.

What We Ate
Ha! I had to hide the beans and rice with a
Chimichanga because I'd
already shoved a bunch in my face
Last Friday we ate crispy tacos, NFNG rellenos (see: below), Chimichangas (Mike's favorite), rice and beans and salsa. Sadly, our avocado was sub-standard and we had no guacamole (I KNOW - so sad!). I gave one of the leftover rellenos to my housemate who, when she had eaten one for dinner a couple of nights later, texted me, "That was an AMAZING relleno!!!!" Yeah, they were that good and my housemate knows her stuff.  The starring roll in this was pork carnitas. I was in charge of the first half of the carnitas, and Lynn took over the shredding, final seasoning and making them crispy - the recipe/method we used is after the jump.

Crispy Taco Shell U
Lynn cooked up the first one with commentary while I observed and I was responsible for the rest - a taco shell refresher course (I had already passed the entry level class a year or so ago but I don't do this very often).  She is a very good teacher. Oh - if you're using tongs with channels make sure the business end remains below the the level of the hinge end so that hot oil never cascades out of the hinge end onto your hand. On my eighth shell, I learned that lesson the hard way. The two little spots of burned skin on my palm say, "Holla!" to that.

Swish and Flick - Okay, Don't Flick, Just Swish and How to Avoid the V

Lynn's about to slug me after I made her move
around the kitchen about a million times
to find decent light to photograph a black pan.
Someday I'm going to film it because I'm pretty sure my description won't do it justice, but the basics are an inch of oil (something neutral with a high smoke point - we used canola) in a pan, a pair of tongs, newspaper or a deconstructed paper bag to drain them on, and a stack of corn tortillas. Having a pan - the one in the picture is a mini-paella pan - with rounded sides helps but isn't a requirement.The oil should be at/around 365F. If your heat's too low, they'll be leathery and not crisp and bubbly. The other big secrets are to keep them moving, keep the part you are cooking submerged, keep the open end open, learn to recognize (by sound) when the oil has stopped bubbling and finally, try to keep the open end facing you.

Slide the tortilla in the oil and swish it around (gently). Pick up one end with tongs so that about 60% is out of the oil and is at (about) a 90% angle. Swish back and forth gently for a seconds until the 40% in the oil kind of holds its shape.
Switch your tongs to the other side and do the same.  It's all abut the U shape.  If the open end starts to close - and, like a clam, it WANTS to close - keep the open end open with your tongs. Once it has a U shape, swish it (slowly and gently on all sides, keeping the part you're frying submerged.  When it is bubbly, and a pale golden brown, remove it and set it on the aforementioned newspaper or flattened paper shopping bag open end down to drain.

Oh - if you end up with a V shape on a couple, as long as the top is open, it's not a bad day. We reused the oil for the Chimichangas which are not deep fried but pan fried. (Mmm... fried!)

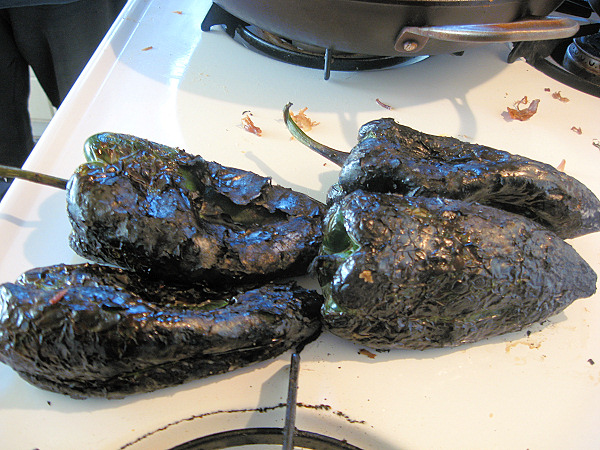
The Truth About Roasting Chiles and NFNG Rellenos

Lynn is also the the one who suggested the "No Fry, No Guilt Relleno". Don't get me wrong, fried things are a wonder but the NFNG Relleno has all the benefits and none of the guilt and you don't have buckets of oil to deal with afterwards. She taught me how to roast chiles.  If you have a gas range, you don't need to do them in the oven, broiler or put them in paper bags to steam.  Just roast those babies over the fire until the skin is completely - I mean completely - black and let them sit a few minutes.  Pick them up at the wide end and scrape them with a dinner knife until all of the skin comes off easy as pie. Oh - do not rinse them.  Do. Not. What? Do you want to rinse off all of that beautiful smoky flavor? Just make sure you scrape off all of the burned skin, take out as many of the seeds as you can manage, and you will have a delicious roasted chile

Do Not Wear Poblano Chiles as Gloves
A couple of years ago, I had the bright (read: stupid) idea to drape the poblanos over my fingers while I was scraping off the skins. Poblanos are generally mild, like any chile, there can be a range of heat.  In this case, they had more than a little heat and by the time we sat down to eat, the top side of the first three fingers of my right hand looked like a cooked lobster and felt like I was holding them over a lit match. Multiple applications of aloe and the miraculous but sadly discontinued Johnson & Johnson First Aid Cream helped but to this day the tops of those three fingers are still very heat sensitive.  Oh - now I leave the tops on and make a long slit in one side of the chile and take out the seeds - much better for stuffing.

We stuffed the poblanos with a mixture (I just eyeballed the amounts) of pork, rice and cheese and I topped them with some salsa and more cheese.  We cooked them just to warm them up and melt the cheese - 350F for about 25 minutes, +/- a few.
Ingredients for the braise.


RECIPE: CARNITAS SUPER STAR!
Ingredients
  • 3-4 lb boneless pork shoulder
  • 1 tablespoon salt
  • 1 tablespoon ground black pepper
  • 1 tablespoon Mexican oregano (regular if that's not available)
  • 1 tablespoon of ground, toasted cumin seeds
  • 4  garlic cloves - mashed + 2 tablespoons olive oil (combined into a paste)
  • 2 cups of chicken stock (or water's fine)
  • 1 medium onion, large dice (I had just 1/2 a red onion so that's what I used)
  • 2 bay leaves
  • 2 limes (I used lemon because that's what I had)
  • 1 orange
  • 2 tablespoons reserved pork fat, or 2 tablespoons oil with a high smoke point 
  • 1 small onion, small dice
  • 3 small to medium garlic cloves, minced
  • 2 teaspoons toasted, ground cumin
  • salt/pepper (season to taste)
 Method
Preheat the oven to 300F / Rack on the lowest  level or 2nd from the bottom - I used a 7 qt dutch oven so I put one rack on the bottom and the dutch oven on the 2nd rack to make sure I had enough space.

  1. Trim the fat cap (if it exists) from the pork shoulder. Cut it into 2" x 3" (ish) inch pieces and trim any big fat globs on the outside.  There is a lot of connective tissue and interior fat - don't mess with that too much.  The connective tissue will melt, as will most of the fat (and then be skimmed off) but even after it has cooked, you want a little left.
  2. Combine the salt, pepper, Mexican oregano and ground, toasted cumin seed in a small bowl. Season each piece on all sides and rub it in.  Slather the pork chunks with the mashed garlic/olive oil mixture. I let my pork sit on the counter for an hour - you could put in the refrigerator for a few hours if you wish.
  3. In a large, heavy dutch oven, nestle the pork chunks in the bottom. Add the onions, bay leaves, chicken stock and both the juice and spent halves of one of the limes and the orange.  Pull the pork chunks around to allow the other ingredients to get in-between the chunks.  
  4. Bring to a simmer on top of the stove and then place the covered dutch oven on the rack and let it cook for at least two hours at 300F.
  5. After two hours, pull the dutch oven out and test the pork chunks.  You don't want the meat to be completely broken down. Stick a dinner fork in one of the chunks and slowly turn it. The meat fibers should easily turn and break apart when it is done. Pick a little piece off and taste it - there's no better way to make sure the texture is right. If it's not done, stick the covered dutch oven back in the oven for a 30-60 minutes, checking it at 30 minutes.
  6. When it is done, take the dutch oven out and leave it on the stove top to cool a little. Remove the pork chunks with a slotted spoon or spider and place them in covered bowl - they can go into the refrigerator. Strain the solids out of the liquid and skim to remove as much of the fat as possible.  Reserve the pork fat - don't throw it away. Depending on how closely you trimmed your pork shoulder, you may need it. I had about a quarter cup and refrigerated it in a small, covered bowl.
  7. Add the strained, de-fatted liquid to a clean sauce pan and reduce until you have the consistency of a glaze. Store the glaze in a covered container.  I had about 1 cup of glaze.
It's crispy time!! When you're ready to use the carnitas... 
  1.  If the cooked pork has been in the refrigerator, remove it and let it come up in temperature a little so it's easier to handle.
  2. Remove a few of the pork chunks to a board and shred them with two forks. II don't shred them completely - I leave a few little chunks. If there are still big fat globs, you can remove them at this time - just don't take it all. Return the shredded pork to the bowl in which it was stored and continue to shred.
  3. You will need to do this in batches. Add 1 tablespoon of the reserved pork fat or oil to a very large skillet (12") .Heat on medium high until the oil shimmers. Add the diced onion ;and season with a pinch of black pepper. Turn the heat to medium and saute until they are translucent. Add the garlic and saute for about a minute. Add the ground cumin and saute for another minute. Remove this mixture to a bowl and wipe out the skillet.
  4. Turn the heat up to high. Add a little (1 teaspoon) of pork fat or oil to the pan and when the fat shimmers, add your first batch of shredded pork. Fill, but don't stuff the pan.  Let it sizzle and turn it down a little if necessary. Check the underside of the shredded pork. It shouldn't be uniformly brown (like hash browns) but about 1/2 the pork on the cooking surface should be browned and crispy. You're looking for a combination of tender shredded pork with some crispy bits. Toss or turn the content over with a large spatula and brown for few minutes more. I turn out each batch on a stack of newspaper but if you're a more delicate flower, you can use a giant stack of paper towels on top of a platter or baking sheet.
  5. Keep crisping up the pork in batches.  Turn down the heat to low, add back the onions, garlic and cumin when you've cooked the last batch and then add back the previously crisped shredded pork.  Pour the glaze from the reserved braising liquid over everything and use tongs to gently toss and combine all of the ingredients.  You can leave this on low to warm or put in the oven on a very low heat to keep it warm.
In the crisping section you can add all sorts of things as desired - diced, roasted hot chiles, chopped tomato - whatever you wish.
reade more... Résuméabuiyad

Portuguese beet and potato casserole

This simple beet casserole can be a meal in itself, or it can be used as an entree. It contains all the health benefits of cooked beets, plus a full range of essential protein and a small portion of fat in the form of butter.

A Portuguese acquaintance described this dish to me, but this recipe is my own version of Portuguese beet and potato casserole. First, rather than simply using ordinary white potatoes, I've used a selection of Little Gems: purple, red and white. Also, I used red onion rather than yellow cooking onion, and Almond milk rather than the dairy milk which would normally found in a Portuguese home.
Portuguese beet and potato casserole

Yield: 4 - 6 servings


Oven: 190℃ (350 ℉)


Ingredients:

1 cup mashed purple, red and white Little Gem potatoes with skins intact
1 cup red onion, thinly sliced
2 medium-sized beet roots, steamed, grated
 2 eggs, lightly beaten
½ cup grated Parmesan
½ cup Almond milk, scalded
 1 tablespoon butter (or ghee), plus 1 teaspoon butter to coat the oven dish
fresh ground sea salt
 fresh ground black pepper corns

Preparation:

1. Prepare oven dish by rubbing the inside with 1 teaspoon of butter. Set aside.
2. Mix the grated beet, mashed potato and sliced onion.
3. Beat eggs lightly, then add Parmesan. Combine. Fold into beet mixture.
4. Add milk, 1 tablespoon of butter, salt, and pepper. Mix. At this point, the mixture will be purple. Have no fear; heat will alter the colour of this mixture.
5. Turn the mixture out into the prepared oven dish.
6. Bake for 50 - 60 minutes. Serve immediately.

Oven fresh Portuguese beet and potato casserole

reade more... Résuméabuiyad

Bourbon-Glazed Roasted Carrots ♥ Recipe

Bourbon-Glazed Roasted Carrots
Today's vegetable recipe: Pretty spring carrots roasted slowly, then drizzled with a caramel glaze flavored with bourbon or another good-tasting liquor.

Thank my sister for this recipe. She's a serious fan of Serious Eats – me too, actually though new posts come fast enough that I miss many. Luckily, my sister's got an eagle eye for more than editing and often forwards some gotta-make-it-NOW recipe from there. Like making pancake syrup out of leftover wine. (Wait. Is there a theme going on here? These carrots, after all, are sweetened with a caramel glaze flavored with bourbon.)

Chances are, these are special-occasion carrots, even if I've "Alanna-sized" the recipe with less fat and less sugar, if only because carrots sold in bunches with their tops on are more expensive albeit ever so pretty. They'd be nice for Easter (aren't carrots somehow perfect for a spring celebration?) but I can also imagine them as a side with steaks on the grill some Saturday, some meal where the meat is lean and the plate needs color and liveliness.
Keep Reading ->>>
reade more... Résuméabuiyad

Brazilian beet salad

Get all the health benefits of raw beet root in this simple, delicious salad. This recipe is for one salad serving. To feed more than one person, simply multiply the ingredients by the number of people sharing the meal.


Brazilian beet salad

                                            Yield: 1 salad serving
Small raw beets

Ingredients:

1 small beet, washed, peeled
1 teaspoon extra virgin olive oil
2 teaspoons red wine vinegar
fresh ground sea salt
fresh ground black pepper corns


Preparation:

1. Grate the beet. 

2. Mix the oil, vinegar, salt and pepper to make the salad dressing, and pour it over the grated beet.
reade more... Résuméabuiyad

Beet, blood orange and raspberry smoothie

This raw beet root smoothie fairly floods your mouth with fabulous taste sensations for there's more goodness in it than the title can say. Strawberries and sweet red bell pepper are added for a whopping supply of whole vitamins, minerals and phytonutrients plus your friend and mine: fibre.

Beet, blood orange, raspberries, sweet red bell pepper, and strawberries

Ingredients:

1 beet, approximately 5 c. (2 in.) in diameter, washed, peeled, chopped
½ cup fresh strawberries, washed, halved, greens removed
½ cup raspberries, washed
1 blood orange, peeled, chopped
¼ fresh, sweet red bell pepper, washed, chopped
¼ cup water

Chopped beet, blood orange, raspberries,
sweet red bell pepper, and strawberries
in blender

Preparation:

1. Wash the fruit and vegetables. 

2. Peel the beet. Roughly chop into chunks. Place into a blender with water. Pulse on 'High'.

2. Add remaining ingredients when peeled, or otherwise treated as indicated in the ingredients list.

3. Blend to a fine puree. (Most raspberry and strawberry seeds will remain intact.)

Beet, blood orange and raspberry smoothie

reade more... Résuméabuiyad

How to Eat More Vegetables: Tip #10

How to Eat More Vegetables:
We all know we should eat more vegetables. But how, how do we do that, really? What real-life tips and ideas work? How can we build our lives around the healthiest of all foods, vegetables? Every Saturday, the 'veggie evangelist' shares practical tips and ideas from her own experience, her readers and other bloggers.

And now for this week's tip:

Keep Reading ->>>
reade more... Résuméabuiyad

Beet greens and fire dragon fruit smoothie

Beet greens and the grey flesh of the subtly flavoured fire dragon fruit create the deep green of this nutrient-rich smoothie. The sweet tartness of Granny Smith apple compliments the mug bean sprouts. Add the juice of lime to broaden the flavours.


Beet greens and fire dragon fruit smoothie


                                                          Yield: 1 serving

Ingredients:

1 bunch fresh beet greens, washed, chopped (about 3-4  whole leaves minus stalks)
1 handful mung bean sprouts, washed
¼ Granny Smith apple, chopped
¼ fire dragon fruit
¼ cup water
¼ fresh lime

Clockwise: beet greens, mung bean sprouts, Granny Smith apple and
fire dragon fruit

Preparation:

1. Wash the vegetables. Separate the leaves from the stalks. Roughly chop the beet greens and put them into a blender.

2. Add water and bean sprouts. Pulse on 'High' until pureed.

3. Add ¼ apple, together with the peel. Scoop flesh out of ¼ dragon fruit and add to blender.

4. Pulse on 'High' until pureed. Add lime juice if desired.
reade more... Résuméabuiyad

Summer Black-Eyed Pea Salad ♥ Recipe

Summer Black-Eyed Pea Salad
Say hello to my latest salad obsession, a hearty salad that's full of crunch and color. It looks like – tastes like – bites like – summer in a bowl! But it can be made any time of year, delivering the sense of summer all year long. Not just vegan, "Vegan Done Real" and just 1 Weight Watchers point!

My friend Chris first brought this to a Mardi Gras shindig. All the food that night was extra fabulous but a few of us all kept going back for more black-eyed pea salad! A few days later, I made the salad myself, nixing the bacon entirely and cutting the oil by half. Again – SO good! Those extra calories weren't in the least bit missed.

And then I made it again – didn't I say this salad is my current obsession? – cutting the oil by three-quarters. Chris and her husband were back for another little gathering and all three of us went back for seconds! So good! So fresh! So flexible!

This is a great dish to carry to a potluck, a family dinner, a church supper. It would be a great dish to deliver to a family where people are gathering for a funeral or where someone's sick or ... to make a meal of, all by yourself, just yourself and a spoon. (Obsession, you say? Uh huh.) I hope you like this salad as much as I do!

TESTIMONIALS
"... smitten by the results. Such a beautiful dish!" ~ Charlie
"... it was fabulous!" ~ Tina
Keep Reading ->>>
reade more... Résuméabuiyad

Indian borscht with raita

This borscht is unusual in that it is a hot soup, one you'll find useful for opening your sinuses and other pipes should you have congestion or a cold. It is warming in all the best ways.

Indian borscht with raita


                                                                                        Yield: 3 - 4 servings


Ingredients:

2 small beets, about 3 - 5 cm. (1.5 - 2") in diameter
1 cup red onion, diced
1 large clove garlic, minced
1 small hot red pepper, seeds removed
1 tablespoon extra-virgin olive oil
½ teaspoon tandoori masala
3 - 5 cups beef, chicken or vegetable stock
1 tablespoon lemon juice
freshly ground black pepper corns
Garnish: fresh mint leaves

Beets, garlic, red onion, hot red pepper


Preparation:
1. Thoroughly wash beets. Remove any wilted or discoloured tops and roots. Place whole beets in the basket of a food steamer or pressure cooker. Cook beets in accordance with your steamer's or pressure cooker's instructions, or visit my post about using a pressure cooker. 

When cooked, remove beets to a heat-proof container and set aside to cool. Either reserve cooking liquid to use in this borscht preparation, or else store for later use in another recipe.

2. While beets are cooking, prepare the onion, garlic and hot red pepper.

3.When beets are cool enough to handle, slip the peels away. Dice. Reserve. 

4. Place prepared red onion, garlic and hot red pepper in a non-reactive soup kettle together with olive oil. Saute until soft, then add tandoori masala and heat through for a minute.

4.  Add diced beets, mixing well. Then add at least sufficient enough stock to cover the mixture. Bring to boil, then reduce heat to simmer for 5 minutes to enable flavours to mingle.

5. Add lemon juice and a grind of black pepper corns. 

6. Puree the mixture, either using a stationary blender or a hand-held blender. Simmer for 10 minutes over low heat. 

7. Meanwhile, make raita, as follows:


Raita

Ingredients:
½ cup commercial yoghurt 
2 tablespoons finely diced cucumber, washed, unpeeled
1 teaspoon ground cumin, toasted
1 - 2 teaspoons finely chopped fresh mint leaves
1 tablespoon fresh lemon juice

Preparation:
Place all ingredients together in a small bowl and mix well.

8. Ladle hot Indian borscht into bowls, topping each with one or more tablespoons of raita. Garnish with fresh mint leaves.
reade more... Résuméabuiyad