Pages

.

Beet, parsnip and sweet pepper soup

Perk up a cold mid-winter evening with the enervating colours and comforting aromas of this pureed soup.

Beet, parsnip and sweet pepper soup
Cooked beet, purple potato and
carrot


Ingredients (red soup):
½ teaspoon coconut oil
½ cup chopped red onion
½ clove garlic, crushed
1 small beet, steamed, peeled, chopped
½  carrot, steamed, peeled, chopped
2 purple potatoes, steamed, peeled, chopped
1 cup beet stock or chicken stock

                                      
Cooked and diced ingredients
for the yellow soup

Ingredients (yellow soup):            
½ teaspoon coconut oil
½ cup chopped white onion
½ clove garlic, crushed
1 parsnip, steamed, peeled, chopped
1 white potato, steamed, peeled, chopped
½ yellow sweet bell pepper, diced
¼ orange sweet bell pepper, diced
1 cup chicken stock


Garnish: 
1 sprig cilantro

Preparation :

1. Use two saucepans. You will cook in both pots at once, treating each mixture separately. Melt ½ teaspoon coconut oil in each pot. Place red onion and garlic in one (the red pot), and white onion and garlic in the second (the yellow pot).

2. To the red pot, add all items listed under Ingredients (red soup).   

Beet soup (red pot)


3. To the yellow pot, add all items listed under Ingredients (yellow soup).

Parsnip and sweet pepper soup (yellow pot)

4.  Simmer both mixtures for 10 minutes.

5. Decant the contents of the red pot into a blender. Pulse at high speed until the mixture is thoroughly pureed. Pour the red puree back into the red pot and reheat over low heat.

Beet puree
6. Thoroughly wash the blender, then decant the contents of the yellow pot into it. Pulse at high speed, as you did with the red mixture. Pour the yellow puree into the yellow pot and reheat. At this point, you may wish to add salt, pepper or other preferred seasonings to each puree.

Parsnip and sweet pepper puree
8. Ladle ¾ cup red puree into one measuring cup and ¾ cup yellow puree into another measuring cup.

9. Simultaneously, pour into a soup bowl from both measuring cups to create the effect shown in the illustration above. Garnish with a sprig of cilantro.
reade more... Résuméabuiyad

On Food and Choices

I shop, primarily, at Rainbow Co-op Grocery and the Ferry Plaza Farmer's Market. I shop seasonally within my geographical region (in the majority - there are some exceptions - yeah, we don't grow coffee beans in California), purchase organically grown food, or food where no pesticides or hormones have been used.  I buy meat that has been ethically raised and slaughtered, check my Seafood Watch iPod app before I buy or order fish or seafood. I eat meat or fish or seafood about three times a week on average. I buy as many un- or minimally processed foods as I can. I do not knowingly purchase GMO foods and I try to use as much of the food I purchase as possible without waste. 

Why? In part, because I can.  I am single, employed with enough disposable income and time to enable my choices.  I spent about three months back in 2007 thinking about how I could change my relationship to food - not just what I wanted to or should eat but everything to do with food the food I choose and purchase. It is a process.

I do not adhere 100 percent to my own personal guidelines, nor do I voice them unless asked when I have been invited into someone's home. I will not criticize others' choices - I do not live in their shoes. I do the best I can when I'm traveling.

I know that on extreme ends of the spectrum - and I am not going to assign a label to either - I am considered un-American, naive, over-privileged, under-informed, half-assed and just plain wrong.  I can live with that. The only thing I find offensive is when people are willfully uninformed, willfully unwilling to try and understand others' point of view or circumstances and willfully unmindful about their own choices.

(I LOVE "Portlandia" - it is a multi-part original comedy series on IFC. The description is of a, "...dreamy and absurd rendering of Portland, Oregon.". Check it out.)
reade more... Résuméabuiyad

How to Eat More Vegetables: Tip #3

baby carrots from Flickr vibrant_art
We all know we should eat more vegetables. But how, how do we do that, really? What real-life tips and ideas work? How can we build our lives around the healthiest of all foods, vegetables? Every Saturday, the 'veggie evangelist' shares practical tips and ideas from her own experience, her readers and other bloggers.

This week's tip:

Keep Reading ->>>
reade more... Résuméabuiyad

Stove-top beet casserole


Yield: 4 - 6 servings

Enjoy the many health benefits of beets while using up left-over cooked chicken or turkey. The addition of Raincoast Crisps makes this beet casserole into filling brunch. In this instance, I used the fig and olive variety of Raincoast Crisps .
Beet casserole brunch with Raincoast Crisps

This highly-coloured beet casserole provides the nutrient value of two cups of cooked beet root. 

Fresh sweet peppers, shallot, oregano and thyme
Sweet peppers increase the amount of phytonutrients without adding starches or gluten. The aromatics -- thyme, oregano and shallot -- season the beets and poultry while contributing small amounts of vitamins (A and C) and minerals (calcium and iron).


The stove-top beet casserole is made in two stages. First, relish is made and set aside to enable the flavours to mingle. Next, the casserole is prepared in a saute pan on the stove top. When the casserole has been cooked, the relish may be spread on top  before serving, or it may be presented as an accessory to the casserole.

Chopped thyme


Relish

Ingredients (relish):
2 tablespoons chopped fresh oregano leaves
2 tablespoons chopped fresh thyme leaves
¼ teaspoon hot chilli sauce
½ shallot, finely chopped
½ of a 300 ml. jar flame roasted sweet red peppers, drained, chopped
2 tablespoons liquid honey

Chopped shallot


Preparation (relish):

1. Place all ingredients in a mixing bowl. Combine. Set aside in refrigerator.


Relish prepared for beet casserole
Beet Casserole

Ingredients:
1 cup chopped cooked chicken
2 cup chopped cooked beets
¼ green pepper, finely chopped
¼ yellow pepper, finely chopped
¼ orange pepper, finely chopped
½ shallot, finely chopped
2 tablespoons lemon juice
2 tablespoons chopped fresh oregano leaves
2 tablespoons chopped fresh thyme leaves
1 egg
½ cup commercial soured cream
1 tablespoon coconut oil
¼ cup fine dried bread crumbs

Preparation:

Beet casserole mixture and bread crumbs
1. Combine the first nine ingredients together in a mixing bowl.

2. Break egg and add to soured cream. 
Stir, then add to the combined ingredients
in the mixing bowl, folding all together.


3. Place coconut oil in saute pan over medium heat. When the oil has melted, add the contents of the mixing bowl to the saute pan, spreading it evenly. 

4. Reduce heat to medium-low. Cover and allow the casserole to steam in the saute pan for approximately 15 minutes. 

5. Remove the lid, sprinkle bread crumbs over the surface and allow to heat through for approximately 5 minutes.

6. Turn out the casserole to a serving dish. Spread prepared relish over the top.

Beet casserole side dish
A small portion of this beet casserole makes an interesting side dish to a main meal.
reade more... Résuméabuiyad

Thoughts on Kale De-Stemming and Pre-Cooking

De-Stemming.

I eat a lot of kale - both cooked and raw. I am lucky to be able to get it year 'round at farmers markets.  The size varies by season.  Right now (February) the stems are generally pretty short (5-7") from stem-end to tip of the leaf, but during the warmer months, very often twice that - or more. Every week I cook up a bunch (or two) to store in the fridge for daily use or use it in a few dishes or a salad.  Many recipes advise you to de-stem by cutting out the stem from the entire leaf.  If I am going to use only four leaves of kale this is fine, but if I am de-stemming two large bunches, I start to feel a little stab-y.

Sometimes I just cut off the woody part of the stems from the bottom of the leaf and don't bother with de-stemming.  If the leaves are tender, it's just not necessary.  I have tasted the stems and as long as it's not woody or stringy, they are generally tender enough, especially if cooked.

How to De-Stem Kale


The easiest and fastest way I've found to de-stem kale is to use your fingers to tear a tiny bit of the leaf at the lowest end on both sides of the stem and then, holding the end of the stem in one hand, strip the leaf off with the other, towards the tip end.  Think about how you strip rosemary leaves from a stalk. Same deal-io.

It is very easy...
...and very fast...

 ...and two batches are de-stemmed in no time flat and ready for washing.

Pre-Cooking.


I just don't understand why recipes so often recommend that you cook kale in vast quantities of water for 5 or even 10 minutes (gasp!) before sauté-ing or adding to other dishes. Curly kale might be a little unruly (it can be very curly) but you might as well chuck a fist-full of cash into the street, if nutrients (not to mention taste) were dollars, when you boil it.  If you must reduce the volume, or need to get the water our of the kale for use in a recipe (as you would by squeezing spinach) either saute or steam it first.  If you know how to do this with spinach, you're good to go with kale.

Wash your kale in a really big bowl by filling it up with water. The bowl needs to be big enough so that there is room for any dirt or grit to sink to the bottom - or do it in batches Add the kale leaves (chopped however you plan to use them is easier than full leaves) and swish it around. A lot. Swish it around a few more times and then don't touch it for a few minutes. After it has rested, pick up handfuls of kale being careful not to disturb the water, and place in a clean bowl shaking a little - but not all - of the water off the leaves in the process.

Heat up a large pan or dutch oven with about a tablespoon of oil - medium high - until the oil is shimmery and there's no more than a tiny wisp of smoke.  Throw a couple of handfuls of kale in the pan and toss it around with a pair of tongs. Push that batch aside and add a couple more handfuls and toss. Repeat until you've added all of the kale, and it is reduced in volume.  Taste it periodically and you shouldn't cook it until it's too limp. I like mine to be brightly colored and tender - not limp and discolored.
reade more... Résuméabuiyad

Roasted Meyer Lemon Slices

You can use any type of lemon.  I prefer Meyers or any type with a thin-ish peel (and therefore less pith). I recently used these (chopped up) in a kale, olive and caper recipe (to be posted) and am planning to pop them into a variety of dishes.  I store mine in a zip-lock bag with a little olive oil slurped in to keep them pliable.


Recipe: Roasted Meyer Lemon Slices


Ingredients & Equpiment:
  • Meyer lemons or any lemon - those with a thinner peel are best.
  • Olive Oil - regular or extra virgin
  • Baking sheet lined with parchment paper or a silicone baking mat
  • A very sharp knife
Method:

Preheat the oven to 375 F / Oven rack placement: middle

Slice the stem and flower ends off of the lemons to the point where there is no pith showing on the face of the lemon. Slice each lemon in 1/4 inch slices being as careful as possible to slice them to an even width. Remove the seeds from each of the slices.  Make sure you look at both sides - sometimes you can't see the seeds until you turn over the slice.

Pour about 1 Tablespoon of oil onto the parchment-lined baking sheet and use a pastry brush to spread it out over the entire surface.  The oil will bead up a little - that's okay.  Lay the lemon slices out on the baking sheet - leave at least 1/2 inch between slices.  Sprinkle a little olive oil over the top of the slices and place on the middle-rack.

Set the timer for 15 minutes.  Check the slices and turn them over.  You're looking for some nice caramelization and browning on both sides and on the edges.  If you (like me) don't make perfectly even slices, you'll need to watch those with thinner edges and remove the early browners.  Once turned, set the oven for another 10 minutes and check. If you're still not happy with the caramelization, check again in 5 minutes.  I don't recommend waiting in longer increments - the slices can go from "not quite ready" to "oh crap - they're burned" very, very quickly. Cool them down on the baking sheet before handling.
reade more... Résuméabuiyad

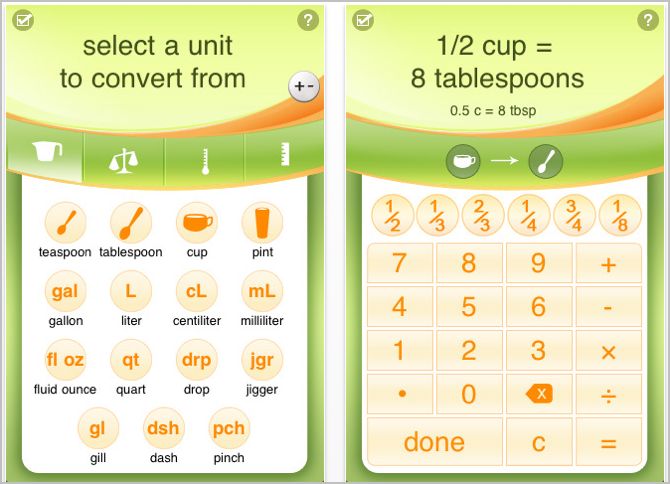
Review - Kitchen Calculator App

I was a music major and had to take, "Math for Music Majors".  No, that's not a class that marries math with music.  It was a class for music majors who didn't give a rat's ass about anything other than music (me) and (historically) had the attention span of a bivalve (just guessing here about the attention span of a bivalve) for math and science classes (also me).

When I need to convert units when cooking, it's not something I'm going to be able to do in my head. Ever. Ergo, it is handy to have a helper just waiting to do my bidding.  I have no idea where or how I found this app, but I use it enough to rate it as "Worth the $".

Publisher: Forward Leap, LLC
Price on review date: $2.99
Runs on: iPod and iPhone
My Rating: Worth the $


In addition to the ability to convert by weight, volume, temperature and  dimension, there is a calculator (+/-), a quick start guide (?) and a settings button (check mark), which allows you to select US or UK units.

 Note: the vendor has a new(ish) app: Kitchen Calculator Pro that includes the ability to:
  • scale recipes;

  • convert ingredients from weight to volume (cups to grams, ounces, etc.)

  • display results in standard cooking fractions

  • 'grow' a database of ingredients, based on the built-in database of common ingredients from the USDA.

Am I going to shell out the $3.99 for the 'Pro' version?  Probably not, although the weight-to-volume (and vice versa) feature is attractive. It's annoying that I cannot pay an upgrade price instead of having to re-pay for the features I already have.
reade more... Résuméabuiyad