Pages

.

German Salad Dressing ♥

So who says you can't make salad dressing?
Today's recipe: Milk. Vinegar. Sugar. No more. No oil! Low carb. Weight Watchers zero points.

It gets no easier than this. When my brother-in-law visited over Christmas, he mentioned the salad dressing that his mother, a World War II German war bride, makes all the time. They call it 'German Salad Dressing'. Me, I'm tempted to dub it "salad dressing for dummies" because it has just three ingredients.

Three ingredients.

And it's got me to thinking. Why in the world do we buy bottles of salad dressing when it's this cheap and simple and tasty to make? So I'm launching a new series of occasional posts with collections of simple classic recipes for home cooks who want to feed their families economically and healthfully. Look for the first one tomorrow. I'm calling it "Never Buy Salad Dressing Again". Who will take the challenge?

FREE ICONS for BLOGGERS Share your love of fresh produce, whether from the farmers market, your own garden or even a CSA farmbox. Four icons celebrate fresh local vegetables and fruits -- and my fellow bloggers are invited to use them on their own blogs. Here's more information about the free icons for bloggers.


VEGETABLE RECIPES from the ARCHIVES
~ more salad dressing recipes ~
~ more five-minute recipes ~
~ more Weight Watchers recipes ~
~ more low-carb recipes ~

GERMAN SALAD DRESSING

Hands-on time: 5 minutes
Time to table: 5 minutes
Makes 3/4 cup (12 tablespoons)

1/2 cup milk
2 tablespoons good vinegar
2 tablespoons sugar (or honey)

Whisk together.


KITCHEN NOTES
The dressing is especially good with soft lettuces such as Boston, red leaf and green leaf.
For aesthetics, use a clear or light-colored vinegar versus a dark balsamic vinegar.


PRINT JUST A RECIPE! Now you can print a recipe without wasting ink and paper on the header and sidebar. Here's how.

NEVER MISS A RECIPE! For 'home delivery' of new recipes from A Veggie Venture, sign up here. Once you do, new recipes will be delivered, automatically, straight to your e-mail In Box.


Do you suffer from lachanophobia? Turn to A Veggie Venture and Veggie Evangelist Alanna Kellogg for the best vegetable recipes online. Find a quick recipe for tonight's vegetable in the Alphabet of Vegetables or plan menus with vegetables in every course. If you're a dieter, turn to hundreds of zero-point, one- and two-point Weight Watchers recipes and many low carb recipes.
© Copyright 2008


reade more... Résuméabuiyad

Memories of Breakfast in Cincinnati


I made a breakfast this morning that brought me back to last summer when I visited my mom in Cincinnati for the first time since she moved there. I was so close to the Mason Dixon Line, and I was hoping to have a down-home, rib-sticking breakfast of biscuits and gravy. I had put out some feelers about places to go and we were pointed toward the Echo Restaurant.

The Echo Restaurant is very retro inside and reminded me of a diner my family used to visit when we lived in New Jersey. It's long closed, but it was called Updike's. I have fond memories of the place.


But in my search for biscuits and gravy on the menu, I came across this thing called goetta. I asked the waitress what it was, and she told me it was a type of sausage.

Here's the story behind goetta. According to Wikipedia, it was a German peasant food. It originated in an area of Germany that saw a large number of people migrate to the Cincinnati area. It's made with ground meat (and pork), and I guess the oats were added to stretch out the meat and have a less-expensive meal. Goetta is very similar to a dish served in by the Pennsylvania Dutch called Scrapple, which it seems more people may have heard of. But goetta has its fans.

Linking the people to their heritage, the producer of store-bought goetta, Glier's, holds a Goettafest annually. What fun!

So as Mom and I sat there at our table, I decided that I needed to try the local foods to complete my Cincinnati experience, and I ordered it. The waitress asked me how I wanted it cooked. I asked her to bring it to me the way that most people order it. Turns out that people like it crispy on the outside and served with syrup.

Just to make sure I had a good breakfast, I ordered a side of the biscuits and gravy. But in the end, they didn't hold a candle to the goetta, so I barely touched them. Here's a pic of my breakfast that morning:


I had to have this goetta again. Since it is only made in the Cincinnati area, I had two choices. Order it online (which means that it would have to be packed in ice and shipped), or make it.

The people in the restaurant were so friendly (I wish people were that friendly here). One woman overheard me talking to my mom and politely brought herself into the conversation to tell me that making goetta was fairly easy. She told me the basic ingredients and said that the package of the pinhead oats that are used to make it has a great recipe.

We were in a rush to the airport on the day I left and I ran into the grocery store. But I didn't see the pinhead oats and my mother promised to ship some to me when she came across it.

But when I arrived home, I had to make the goetta right away, so I didn't wait for my mom to send the pinhead oats. I used steel cut oats instead. This next post is of my recipe and photos.
reade more... Résuméabuiyad

Goetta


I took this picture today of my breakfast. However, this is part of the batch of goetta I made at the end of summer, eight months ago. When I was researching goetta I was reading peoples' stories and of their memories of goetta making. Someone said that their mother would make a big batch that would last throughout the winter. In fact, many people wrote of freezing their large batches of goetta. The process for making the goetta is a long one, so making a large batch makes sense.

It tasted almost as good as the day I first made it. It was worth saving. Here's a picture of how it looked that day. The biggest difference is how it held it's shape.


It definitely held its shape better when it was fresh. That is why for today's picture, I covered it up with my egg.

Looks aside, it was delicious. I had actually planned on taking a few bites only, since I'm the first to admit there's nothing the slightest bit healthy about goetta. But it was so good, drizzled with Grade B maple syrup and the yolk of my egg, that at first bite, I knew I was powerless to resist. I'm glad I only cooked up a small piece!

I recommend the Grade B syrup. It has a more rich maple flavor than Grade A.

The recipe I made was actually a combination of three recipes. I liked the ingredients of one recipe, but I liked the crock pot method of another. I was influenced by the third. In the end it all worked out well and this recipe was a success.

I used this (from Trader Joe's) for the oatmeal component of the recipe:


However, a traditional goetta is made with pinhead oats, which are tiny little round oat balls, and are often in birdseed mixtures. You can order it online if you want to try it out.

Ingredients
3 quarts water
2 tablespoons salt
2 teaspoons ground black pepper

5 cups steel cut oats
2 qt. cold water
2 lb. ground beef
1 lb. ground pork
1 medium onion, minced
1 1/2 tsp. salt
1/2 tsp. pepper
2 bay leaves


Boil the water, salt, and pepper on the stove top while the crock pot heats to high temperature. Add the water and the oats to the preheated crock pot. Cover and cook for 90 minutes.

Mix the beef, pork, onions, salt, and pepper together in a bowl.


Add them to the oatmeal-filled crock pot. Mix it up and toss in the bay leaves.


Reduce the heat to low. Cover and cook the mixture for three hours, stirring occasionally.


When your mixture is cooked, it will look like this:


Place the mixture into a nonstick loaf pan, perhaps even lined with wax paper for ease of removal. Refrigerate the loaves for at least an hour (up to overnight).

In the morning, you can remove the mixture from the pans and slice them into individual portions. It should hold it's shape as you slice.

Fry the slices in a nonstick pan with enough oil to keep them slick on a medium-high flame. Don't try to turn over until you can see that the first side is good and brown. Most people like their goetta crispy on the outside, yet not burnt.


Serve and eat your creation! Impress your friends and family! This is good stuff.


reade more... Résuméabuiyad

Eggplant Steaks ♥

As Alton Brown would say, Good Eats!
Today's vegetable recipe: Eggplant slices brushed with steak sauce and honey, then broiled and topped with Parmesan. Easy. Quick. Tasty.

I love to chat up the produce guys at the grocery store. They're full of good tips. Just yesterday, one was unpacking a lug of gorgeous eggplant. "Do you ever get Japanese eggplant?" I asked, just curious. "Some times," he answered. "Do they sell?" I wondered. Nope. "But the globe eggplants are one of our best sellers."

Really? This veggie evangelist had best catch up! There are several good eggplant recipes here -- but clearly, not enough. I grabbed a couple of eggplants, came home and straight-off made these for lunch -- using pantry ingredients, nothing more. They were just excellent, creamy on the inside, slightly crispy on the outside, lots of flavor. Score one for eggplant lovers, here's another great way to cook eggplant.

While the 'Eggplant Steak' name suggests something meaty and substantial enough for a vegetarian supper, for me, these are a side dish.

NUTRITION NOTES The Alton Brown recipe that I modified called for four whole tablespoons of olive oil. Really? I couldn't imagine any oil was necessary with so many other wet ingredients. So I mixed two versions of the sauce, one with oil (albeit just one tablespoon) and one without. The oil isn't necessary -- but it does help the eggplant cook evenly and glisten beautifully. Side by side, I preferred the eggplant slices brushed with the oiled sauce but otherwise wouldn't have missed it.


FOR THE RECORD This is my contribution to Weekend Herb Blogging, this week hosted by The Well-Seasoned Cook.

FREE ICONS for BLOGGERS Share your love of fresh produce, whether from the farmers market, your own garden or even a CSA farmbox. Four icons celebrate fresh local vegetables and fruits -- and my fellow bloggers are invited to use them on their own blogs. Here's more information about the free icons for bloggers.


EGGPLANT RECIPES from the ARCHIVES
~ Roasted Baby Eggplant Halves with Herbs, impressive-looking and delicious ~
~ Grilled Eggplant with Balsamic Honey Syrup, utterly delicious ~
~ Summer Vegetable Stew, one of my very favorites from Year One ~
~ more eggplant recipes ~

~ 2006's asparagus with anchovies & garlic, quick, easy, low-calorie and a tad unusual ~
~ 2007's English peas with fresh mint, the English classic ~


EGGPLANT STEAKS

Hands-on time: 10 minutes
Time to table: 20 minutes
Serves 4

1 one-pound globe eggplant, stem end trimmed, cut into 1/2 inch slices cross-wise

SAUCE
2 tablespoons Worcestershire sauce (oops! I didn't know til just now that I forgot this)
2 tablespoons thick steak sauce (St. Louisans, I used the great steak sauce from Tucker's Place, mine came from Schnucks but I've seen it elsewhere too)
1 tablespoon olive oil (optional)
1 tablespoon honey (if needed, warm it in the microwave for a few seconds to make easier to pour)
1 teaspoon apple cider vinegar
Salt & pepper to taste.

1/2 ounce of fresh Parmesan, grated

Mix the sauce. Brush onto both sides of the eggplant slices, arrange on a baking sheet. Place under the broiler until golden brown (the inspiring recipe said 2 minutes, mine took 3). Turn over and repeat. Sprinkle with cheese and put back under the broiler for another minute or two, just until golden. (Watch carefully, Parmesan will turn fast.)


PRINT JUST A RECIPE! Now you can print a recipe without wasting ink and paper on the header and sidebar. Here's how.

NEVER MISS A RECIPE! For 'home delivery' of new recipes from A Veggie Venture, sign up here. Once you do, new recipes will be delivered, automatically, straight to your e-mail In Box.


Do you suffer from lachanophobia? Turn to A Veggie Venture and Veggie Evangelist Alanna Kellogg for the best vegetable recipes online. Find a quick recipe for tonight's vegetable in the Alphabet of Vegetables or plan menus with vegetables in every course. If you're a dieter, turn to hundreds of zero-point, one- and two-point Weight Watchers recipes and many low carb recipes.
© Copyright 2008


reade more... Résuméabuiyad

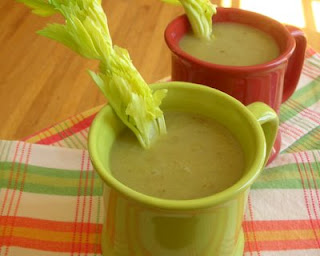
Day 345: Cream of Celery Soup ♥

Today's vegetable recipe: Simple celery soup that tastes like something 'more'. Weight Watchers 1 point.

~ recipe & photo updated 2008 ~

Awhile back, I puzzled over a tidbit in a magazine. "To have fun," it asked, "would you prefer to go to a party with lots of old friends or one where you'll know hardly anyone?"

Turns out that if FUN is the desired experience, then partying with new people is the ticket. (Okay, yes, I know, who can make such a generalization? and why is new fun better than laughing over old jokes? and yes, the folks who did the study, went to the parties and probably wrote the piece in the magazine might have all been Es in the Meyers-Briggs schema. And who reads this stuff anyway? Please, bear with me.)

And so it's turned out cooking and writing about vegetables for nearly a year now. It's great fun to try new vegetables. But it's also quite something to discover new dimensions in standby vegetables.

Take the under-appreciated celery. It had me extolling leafy virtues in Day 247's apple and celery salad (2008: my go-to salad whenever finding plenty of celery leaves in a celery bunch). It had me moaning about Day 317's simple braised celery. And here I am again, raving about a simple and yet somehow complex soup that is somehow 100% celery and yet 100% something else altogether.

The Wednesday Chef had the same reaction on Monday with a Leslie Brenner recipe from the Los Angeles Times. Luisa's soup was as elegant as her description; mine was intentionally more rustic. Still, our two versions prove: celery can surprise.

NUTRITION NOTES This is a winner calorie-wise, just 1 point or 2 points for Weight Watchers but tasting like far more.

NEXT TIME I would definitely serve a creamy smooth version of this soup like Luisa's as a dinner party starter; just strain out the solids through a strainer or my favorite chinois.

DECEMBER 2006 UPDATE I made this soup again for a family gathering. It was a big hit, everyone slurped up the last drops. Because the soup is so light, it pairs well with crusty bread, good cheese and sandwich meat for a complete meal. I did strain the soup but prefer it with the homely fiber.

2008 UPDATE This lovely celery soup recipe was originally published in 2006, just as I was ending that first mad of year of cooking a vegetable in a new way, every single day. Now that I'm revisiting favorite recipes, again and again I'm pleased that the recipes taste just as good the second time around. This is a classic vegetable soup recipe, so spare and simple. And in days of rising food prices, it's also cheap to make -- a bunch of gorgeous celery this week was only $.99, so almost $.50 a pound.


VEGETABLE RECIPES from the ARCHIVES
~ more soup recipes ~
~ more celery recipes ~


CREAM of CELERY SOUP

See the Wednesday Chef's inspiring post and recipe
Hands-on time: 20 minutes
Time to table: 60 minutes
Makes 7 cups

5 cups good chicken stock (I had 4 cups homemade turkey stock, it seemed plenty)

1 tablespoon unsalted butter (the inspiring recipe called for 3 tablespoons)
1 large onion, diced (about 1 1/2 cups)
1 Idaho potato (about 3/4 pound), peeled and diced (see ALANNA's TIPS)
1 bunch celery, trimmed, in 1/2 inch pieces (about 10 ribs, I put in the leaves and everything)
1/4 teaspoon kosher salt
1/8 teaspoon freshly ground white pepper (see TIPS)
2 tablespoons cream, optional (I didn't use any)

Bring the stock to a boil in the microwave. (This is a time-saving tip that can be omitted if there's no rush.)

Melt the butter in a large pot or Dutch oven over MEDIUM HIGH til shimmery. Add the onion and stir well to coat with fat. Let the onion cook, stirring often, while prepping the potato and celery. Add the potato and celery and stir to coat with fat. Let cook until the broth is hot, then add it. Bring to a boil, cover and reduce heat to MEDIUM (or the temperature required for a slow simmer). Cook until celery is soft, 20 - 30 minutes. Season with salt and white pepper.

In two or three batches for safety, puree in a food processor or blender til smooth. (The job's too much for an immersion blender.) For an ultra smooth elegant version, strain out the solids and add cream. Serve and enjoy!


ALANNA's TIPS
The purpose of the starchy potato is to thicken the soup. With no potato on hand, I used 1 1/2 cups cooked brown rice for thickening.
Some folks say that white pepper has little flavor. For color purposes, it would be especially advisable if you're making an 'elegant' version. I was plain out so just used black pepper.


© Copyright Kitchen Parade 2006


reade more... Résuméabuiyad

Two Dinners of Latin Flavors

With the same three recipes (Coconut Rice with Ginger, Chiles, and Lime, Quick Black Beans, Cuban Pork Tenderloins) , I ended up with two different meal options.


Option 1 (The Tacos ):
(my personal favorite)


Option 2 (plated together in separate areas):


A very good friend of mine, Karen, is moving out of the area this week. Joe and I stopped by her home as she was packing-up the place. We found ourselves in the kitchen and mentioned we were on the way to Trader Joe’s. That reminded Karen that she had a ton of food that she was going to have to throw away, so Joe and I walked away with most of the contents of her freezer, including a pork tenderloin.

I’ve only bought pork tenderloin a few times. Most of them were for Joe to grill when friends were over. He made them, I didn't. Other times I bought a pork tenderloin it was already marinated for me, and then Joe cooked it. So this pork tenderloin was a new adventure for me.

What to do with pork tenderloin? Well, the bags of rice in my pantry came to mind. And just the other day I while digging for something in there, I saw some unsweetened coconut flakes. A recipe came to mind.


The Coconut Rice with Ginger, Chiles, and Lime recipe is a Molly Katzen recipe I made once many years ago. It comes from her cookbook Vegetable Heaven. And just my luck, I had most of the ingredients on hand!

The Cuban Pork Tenderloin Marinade was an afterthought to the rice. I went to Recipezaar.com to look at pork tenderloin recipes. Cuban Pork Tenderloin was a highlighted recipe in my search and seemed a perfect match, sharing some of its ingredients with the rice recipe. I really didn't mess with the recipe listed there.


And what Latin dish with white rice doesn't have black beans? None! I ended up throwing them together on the fly. But it's a tasty little side dish, and it's quick and easy.

The tacos were a complete surprise! The day after I made the pork (option number 1), I was running out the door to take my dog Elvis to the vet. I was hungry and only had a minute to grab something because I was already late. I threw together a mini taco and microwaved it for one minute and literally ate it on my way out the door. That is not the proper way to do a taco. But I immediately noted that these tacos were better than the dinner plate I had put together the day before.

After I got home, I redid the tacos, making them the correct way. Here's a link to Taco-Making 101.


And these are the recipe posts for the meal components:

Coconut Rice with Ginger, Chiles, and Lime

Quick Black Beans

Cuban Pork Tenderloins


reade more... Résuméabuiyad

Cuban Pork Tenderloins


This marinade was enough to prepare up to four tenderloins. I only had one, so I cut all the ingredients in half. For the rum, I used Bacardi Select (because I had it).

The original recipe that I found called for marinading the pork for 24 hours. I think that was too much, and I am recommending an eight-hour soak instead. I could see myself mixing the ingredients at night, and then throwing in the pork before going to work in the morning. Then, by the time you get home, they will be just right.

I grilled the pork. I found something online to guide me that said to preheat the grill on high, put the tenderloin on the grate, cover and cook for seven minutes. Then flip it over and cook six more minutes. At that point, it's best to use a thermometer. I have an instant-read thermometer, but I'm sure that a regular one would work.

My point is, the thermometer should read 150-155 degrees in the thickest part of the tenderloin. Then take it off the grill and let it sit for five minutes before slicing. I think the purpose is to seal in the juices. Otherwise, they would all run out with the first slice, and that wouldn't be good.

Note: There were Internet articles that said that once the thermometer hits 140 to turn off the flame and cover and let sit on the unlit grill for 5 minutes, but when I tried that, the inner temperature didn't climb the way they said it would. It dropped. That's why I'm not going to recommend that procedure to you.

But if you don't have a grill, you could toss the tenderloin in the oven at 400 degrees and cook for approximately 25 minutes. I think that with pork, you should count on a thermometer to tell you when it's done.


The Marinade
1/4 cup olive oil
1/2 cup fresh orange juice
1/4 cup fresh lime juice
1/4 cup dark rum
5 green onions, finely chopped
2 tablespoons minced fresh garlic
2 teaspoons dried oregano
1 teaspoon cumin
2 teaspoons salt
1 bay leaf
1 teaspoon black pepper

Whisk together all of the ingredients and transfer to a large heavy Ziploc plastic bag, add the tenderloins to the marinade; close bag tightly and turn to coat.

Place the bag in a large bowl or on a plate and refrigerate for 8 hours. If possible, turn over the bag half-way through the marinating time.


Side dishes in the photograph are:


reade more... Résuméabuiyad